Please look at our Passport Compatibility article for more information about how Passport interacts with other Kandji and macOS features.
Add a and Configure a Passport Library Item
To add this Library Item to your Kandji Library, follow the steps outlined in the Library Overview article.
Give the new Passport Library Item a Name.
Assign to your desired Blueprints.
.png)
Configure the Authentication configuration, User provisioning, Access, Login window, and Help window sections to fit your environment. (For details, see below.)
Click Save.
Authentication Configuration
How you configure authentication for the Passport Library Item depends on which IdP you use.
For Google Workspace, provide the certificate you downloaded from Google Workspace. For more information, see our Passport Configuration with Google Workspace support article for more information, then continue with the User Provisioning section of this article.
For Microsoft Entra ID, Okta, OneLogin, or another IdP that supports OpenID Connect (OIDC), continue with the Configure OpenID Connect section of this article.
Configure OpenID Connect (OIDC)
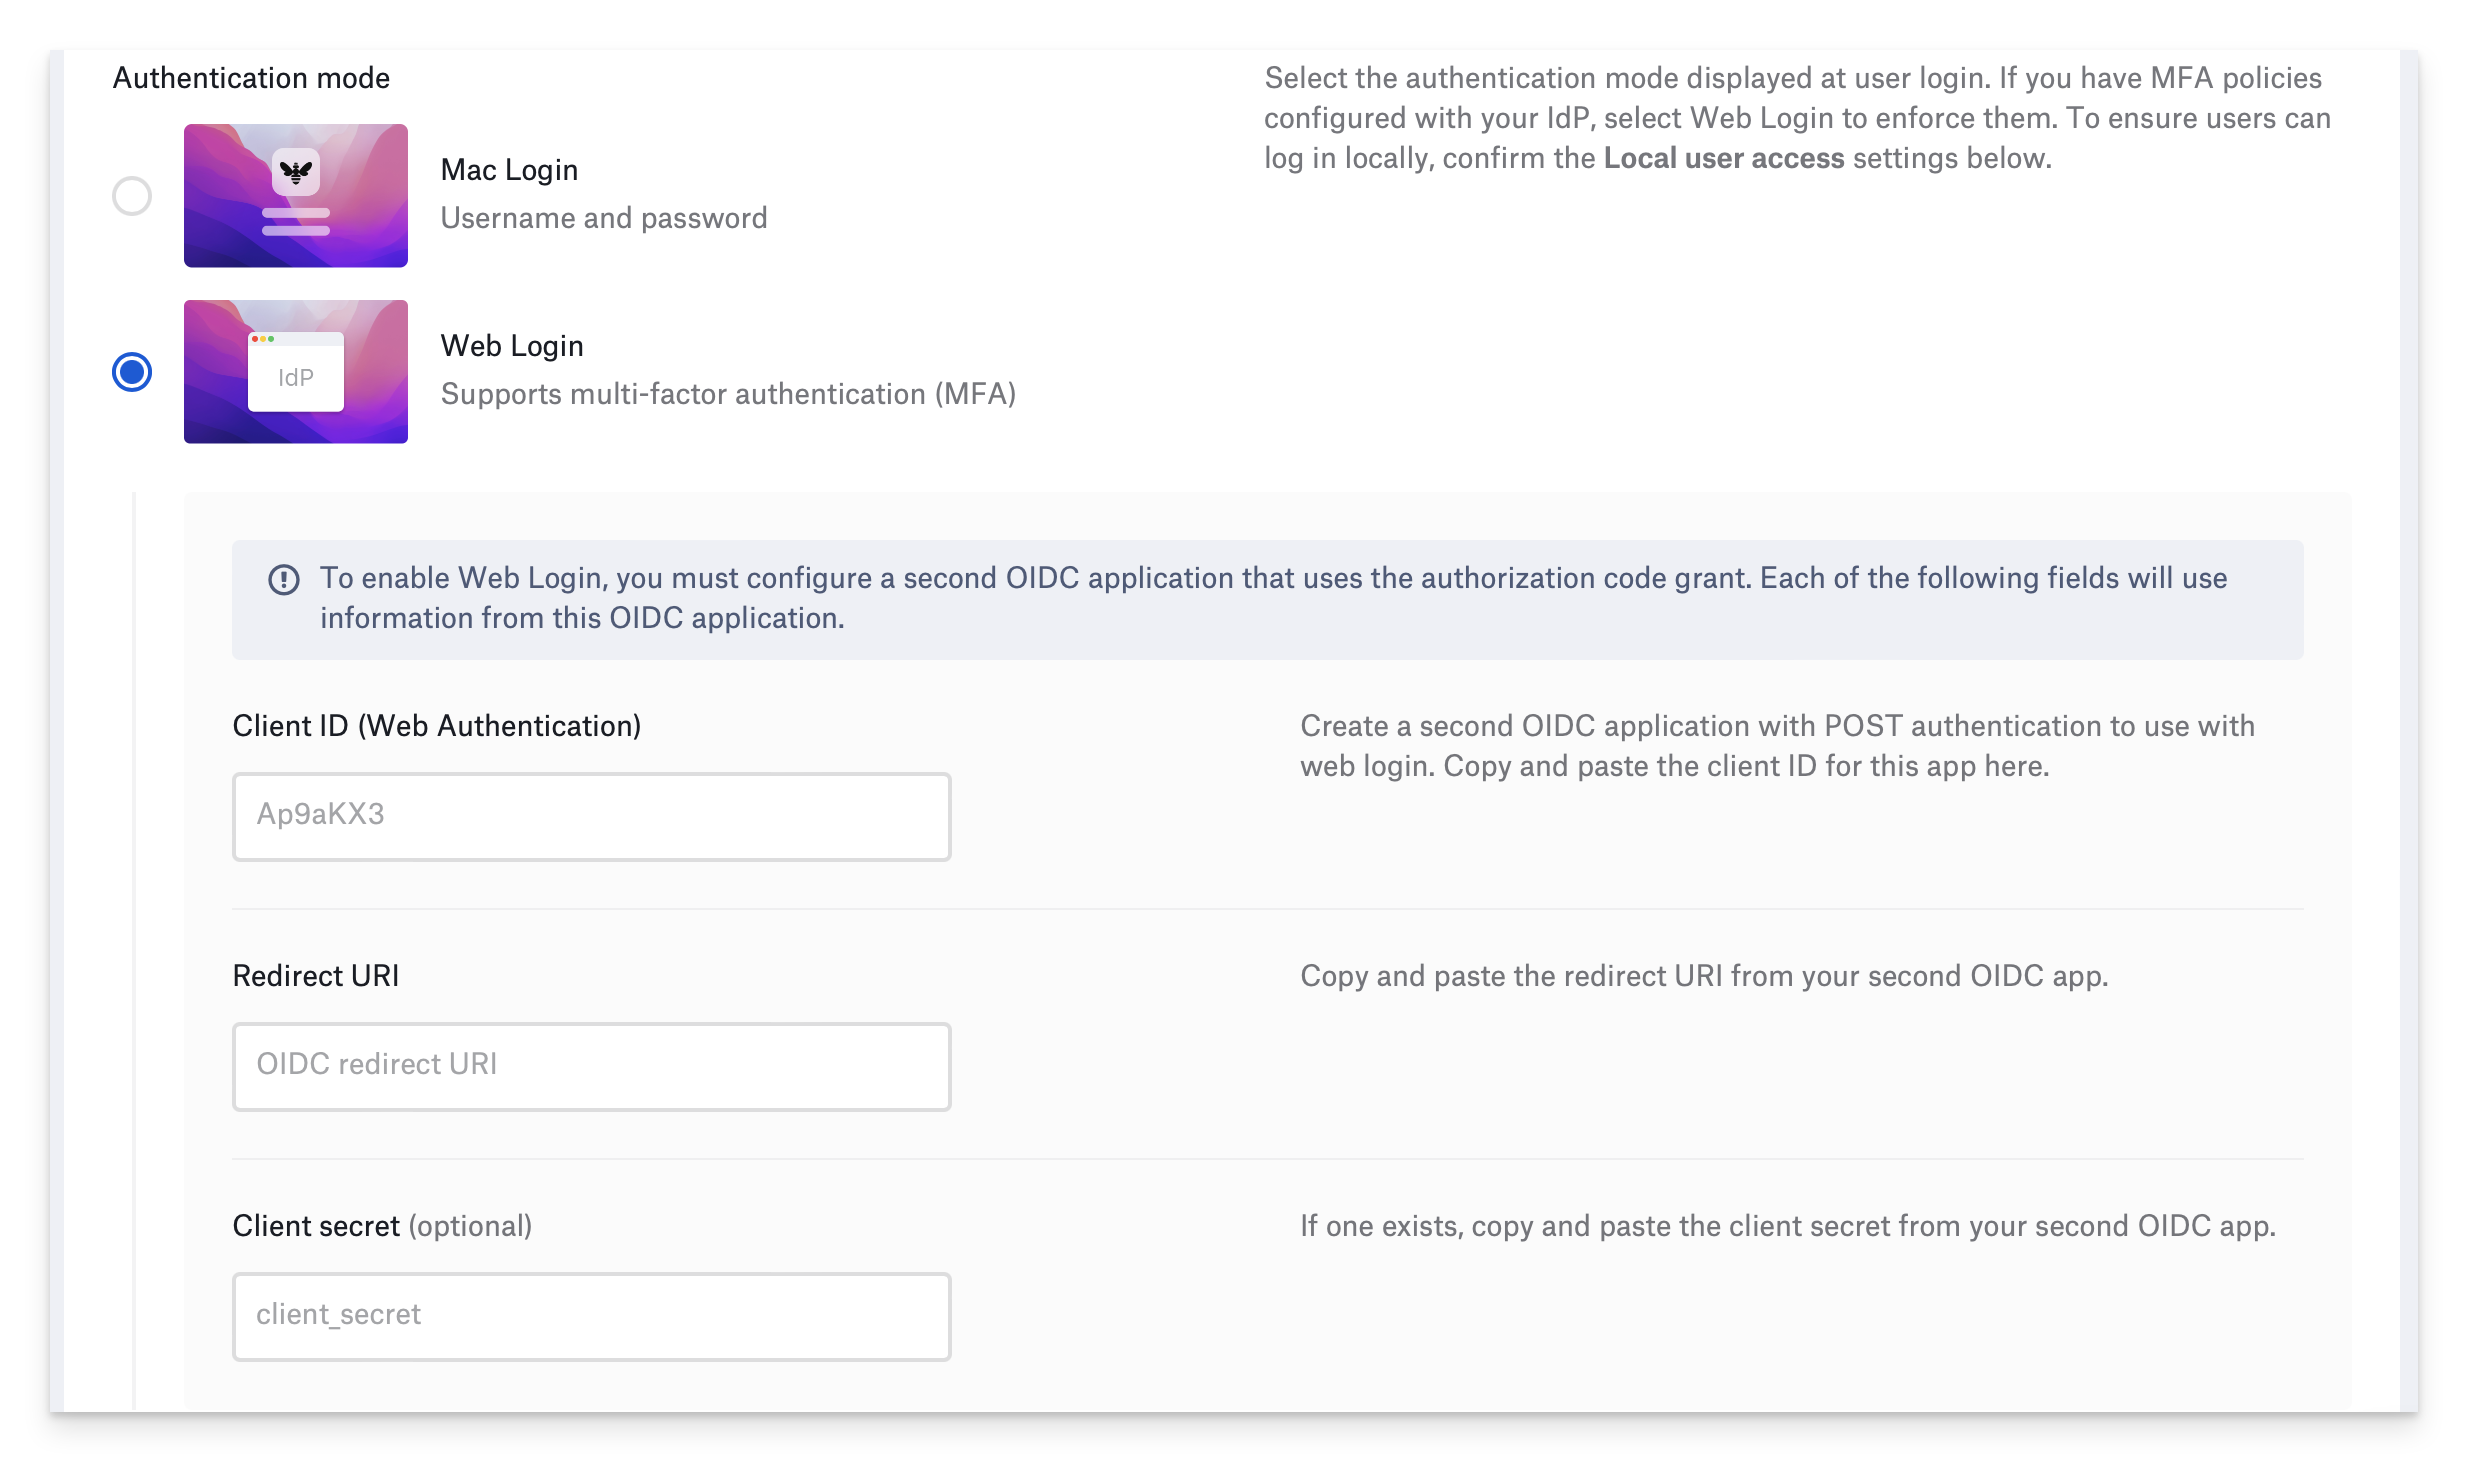
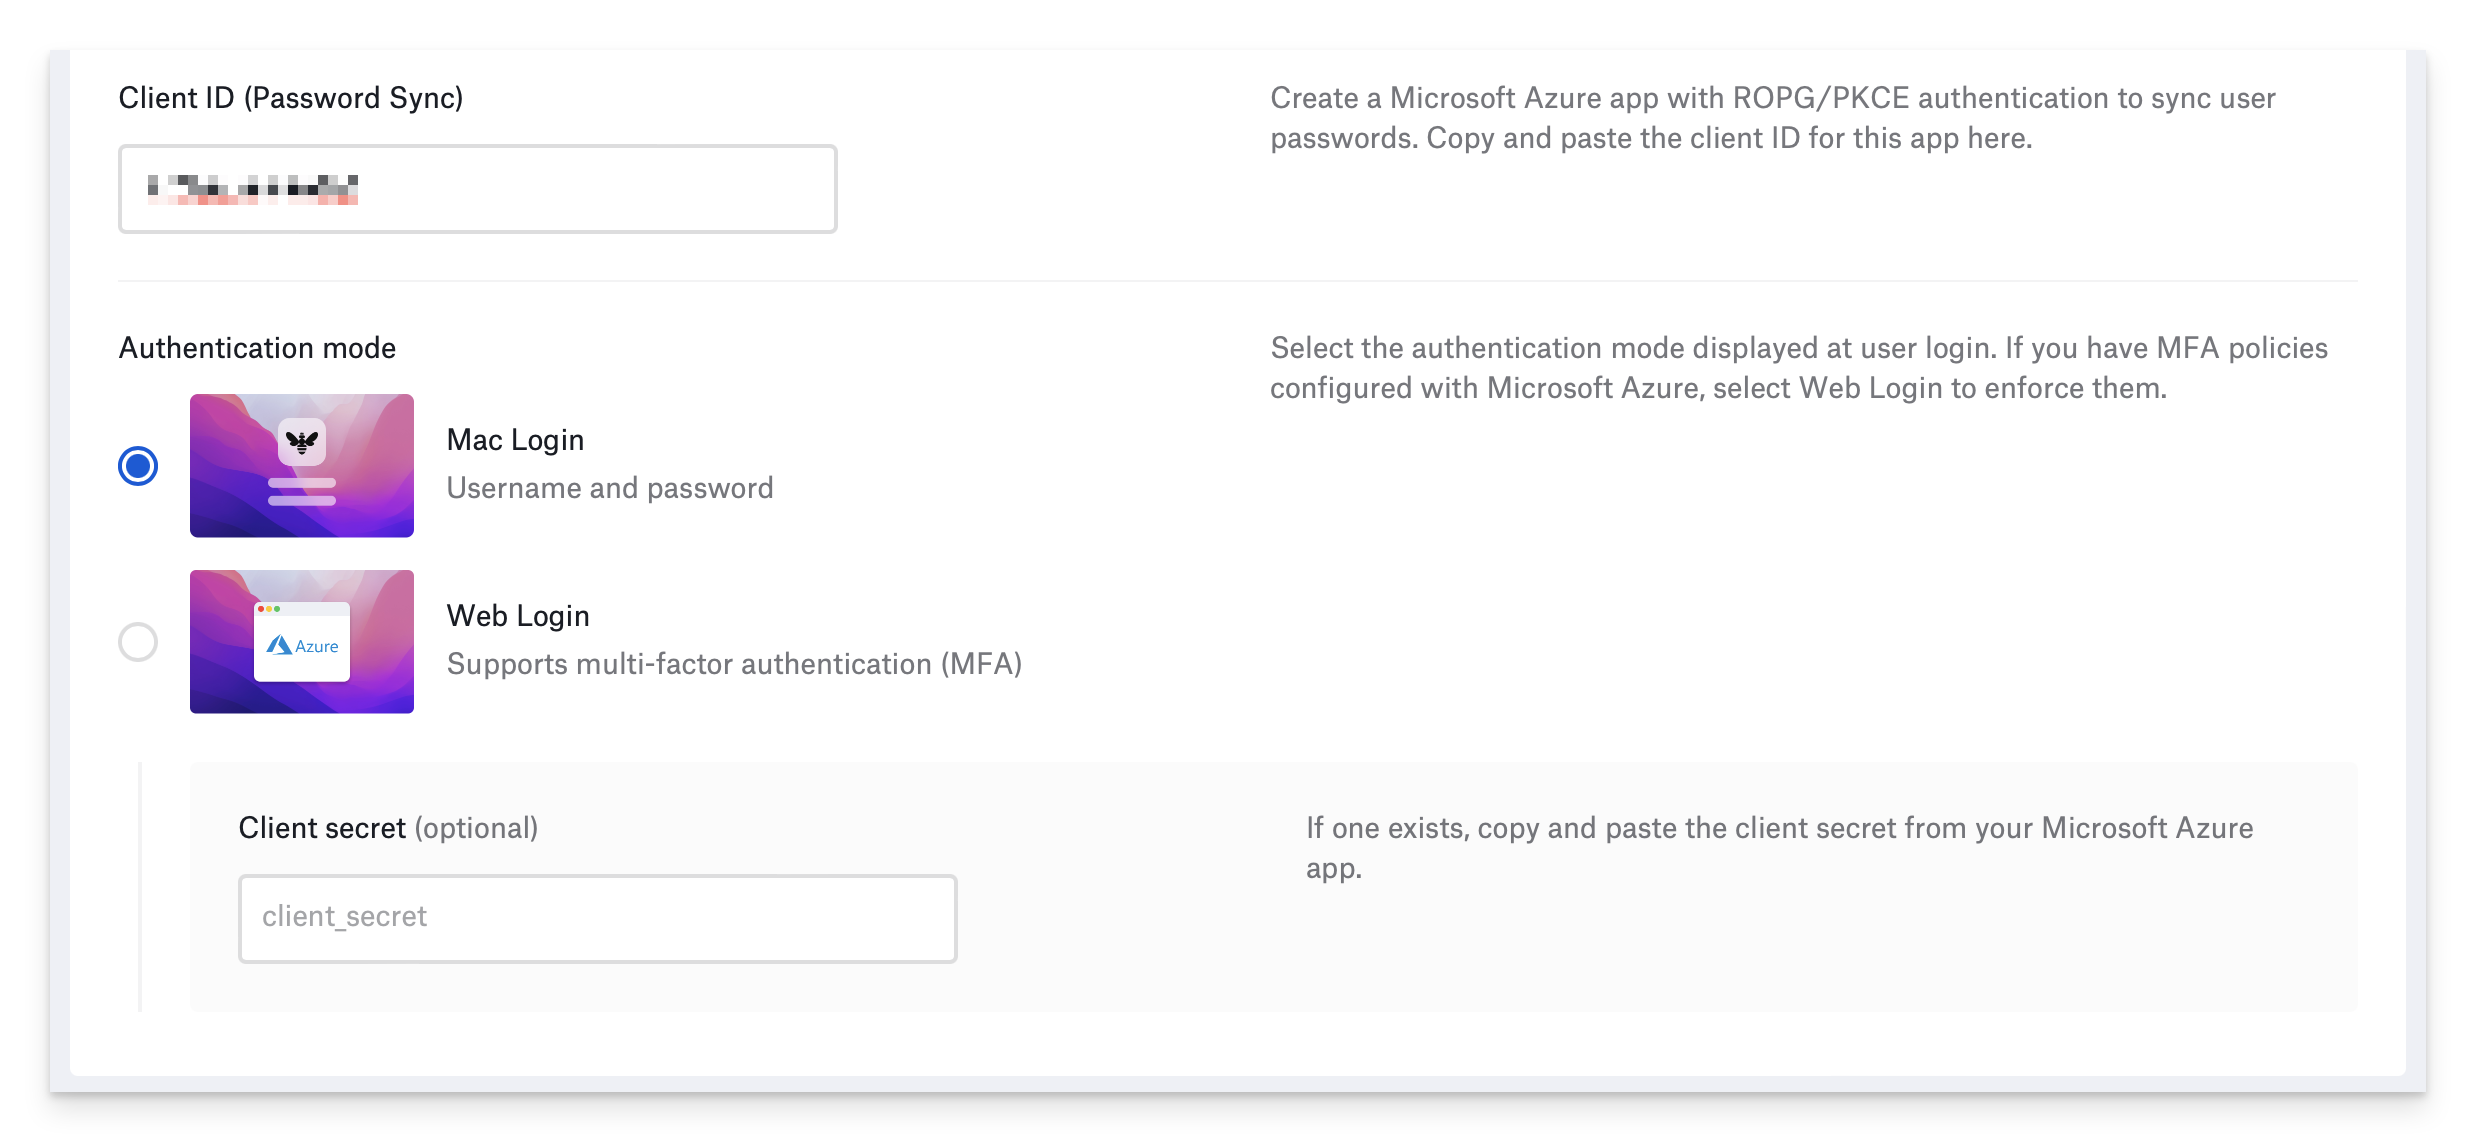
For Microsoft Entra ID, Okta, OneLogin, or another IdP that uses OpenID Connect (OIDC), you can configure Passport to use one of the following authentication modes:
Mac Login: Presents username and password fields to the user.
Web Login: Presents a web view of your IdP's login fields, to support users by providing an additional factor of authentication; additionally, it displays a Local Login button. If you set your Identity provider to be OneLogin or Other, you must configure an additional app, as outlined later in this article.
In Web Login authentication mode, if users click the Local Login button, Passport removes the web view window and displays username and password fields and a Web Login button so users can return to the Web Login mode.
If the Passport Authentication mode is set to Web Login, which supports multi-factor authentication (MFA), users will need to authenticate again. If FileVault is set to Disallow automatic FileVault Login and the Passport Authentication mode is set to Web Login, users will need to authenticate three times in total after a device has been powered on or after a device restart.
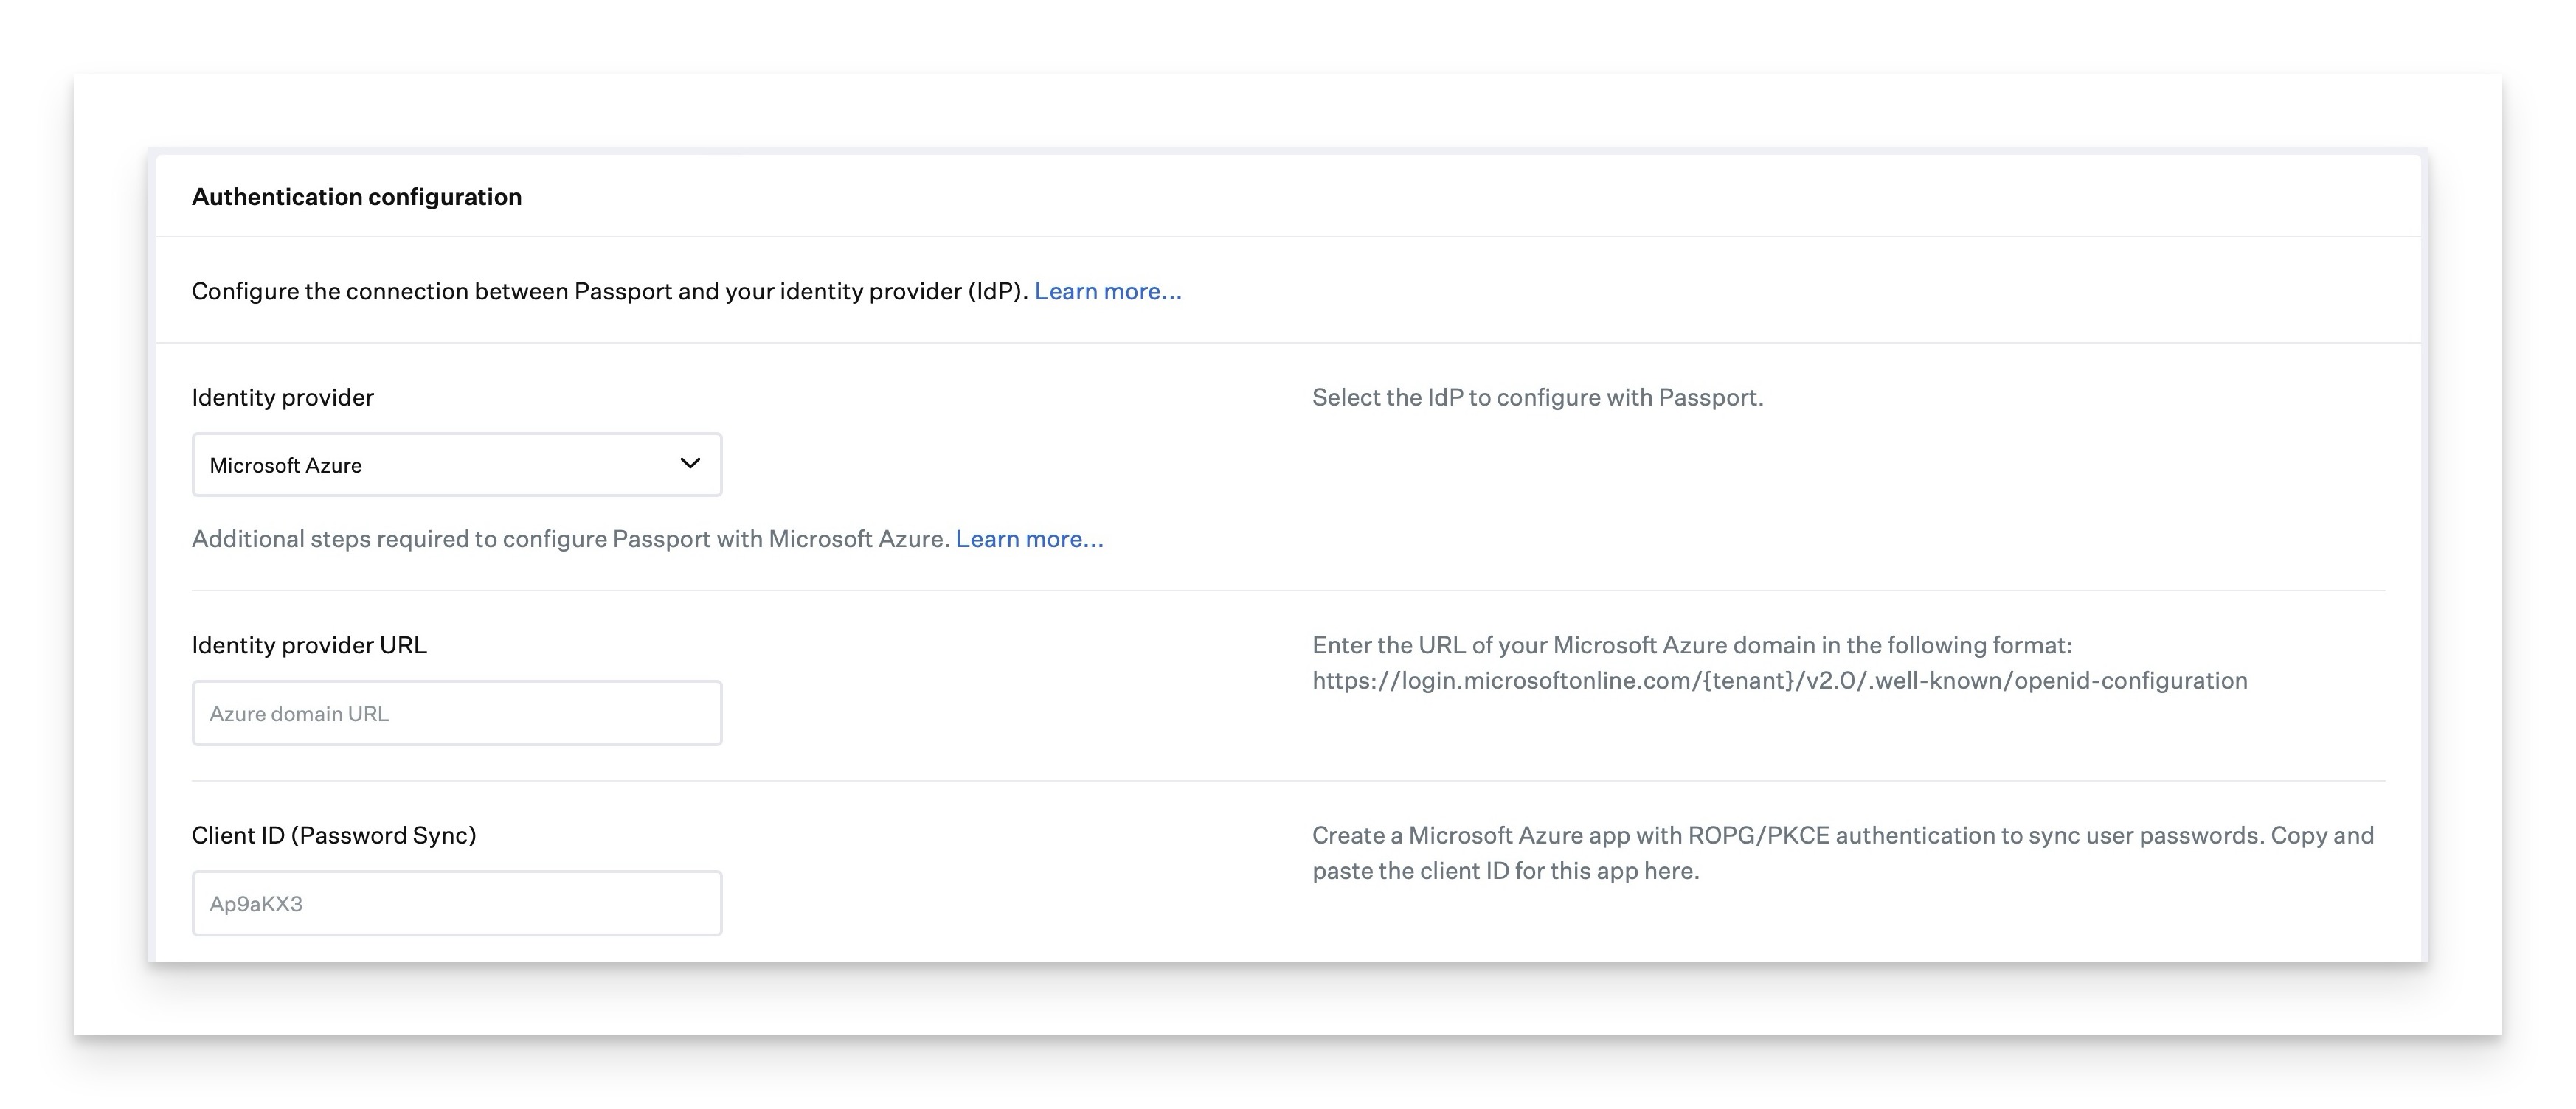
In the Settings section, in the Authentication configuration section, click Identity provider and select your IdP.
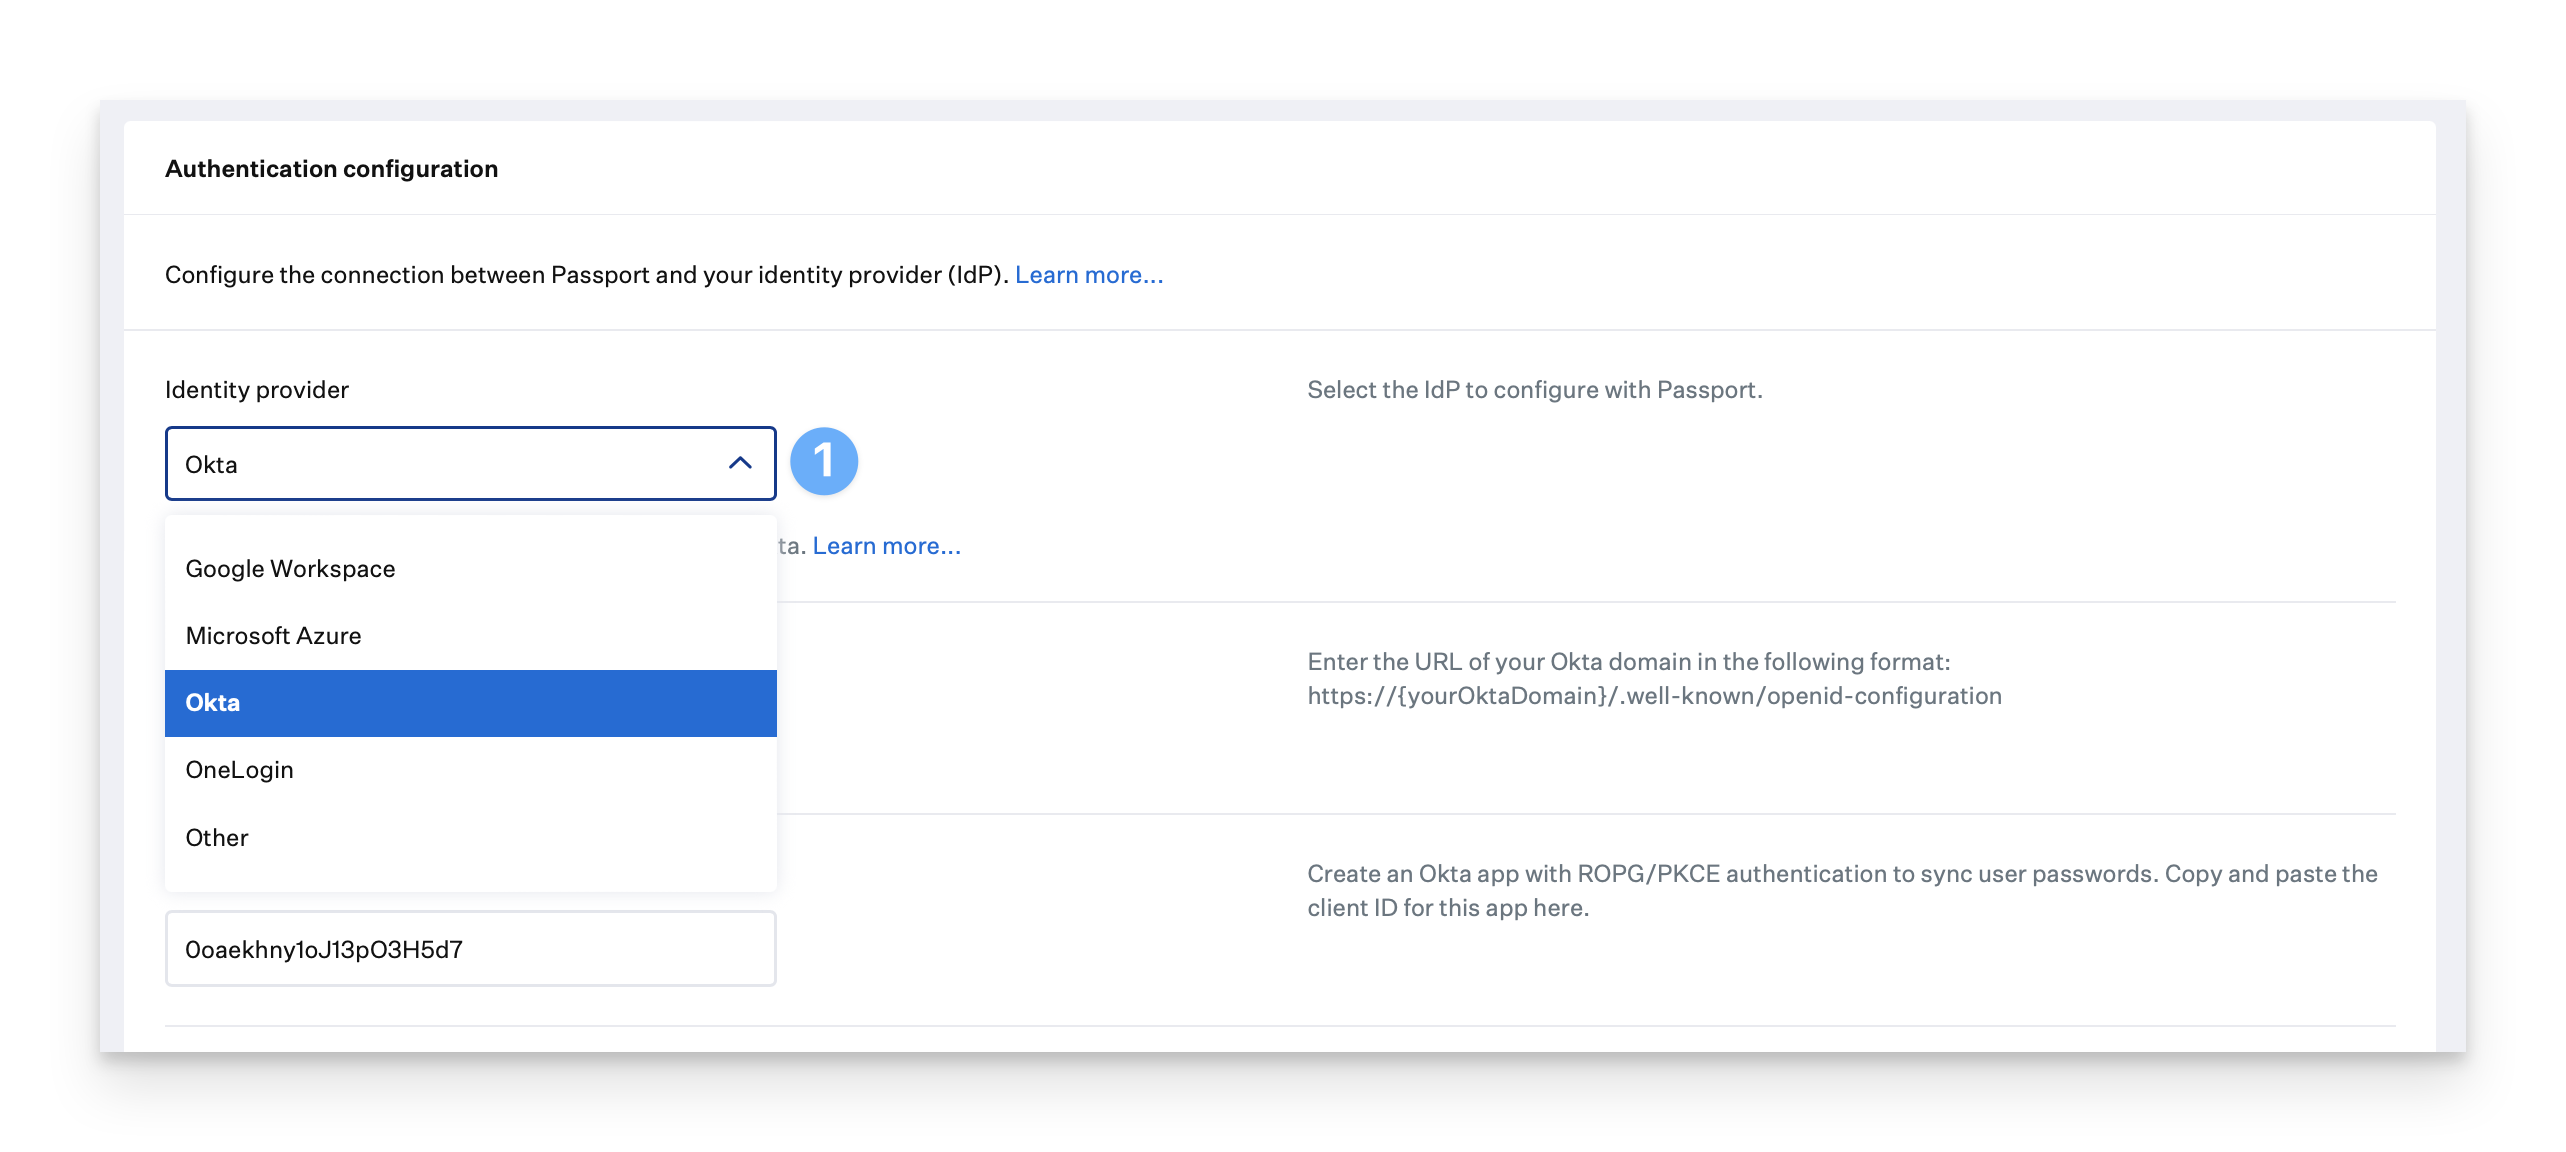
Enter the appropriate values in the Identity provider URL and Client ID (Password Sync) fields.
Be sure your OpenID Connect (OIDC) application is configured with your compatible identity provider (IdP). You will need your identity provider URL and the OIDC application ID to configure Passport. For more information on how to configure specific identity providers, see our Microsoft Entra ID (formerly Azure AD), Okta, Google Workspace and OneLogin support articles.
The following details vary depending on the IdP you selected in the previous step.
In the Identity provider URL field, enter the IdP's OIDC well-known configuration endpoint. As displayed to the right of the Identity provider URL field, common formats include:
Microsoft Entra ID:
If you are unsure of your tenant ID, follow the instructions located here to find it.https://login.microsoftonline.com/{tenant}/v2.0/.well-known/openid-configurationOkta:
https://{yourOktaDomain}/.well-known/openid-configurationOneLogin:
https://{subdomain}.onelogin.com/oidc/2/.well-known/openid-configurationOther:
https://{OIDCDomainURL}/.well-known/openid-configurationIn the Client ID (Password Sync) field, enter the client ID of the OIDC application configured in the identity provider's platform.
Select the Authentication mode. If you have multifactor authentication (MFA) policies configured with your IdP, select Web Login to enforce them.
If you selected Mac Login and your IdP app is configured with a client secret, enter it in the Client secret (optional) field.
If you are using Microsoft Entra ID, the "Client Secret" is the Client Secret Value, not the Client Secret ID. Using the Client Secret ID will result in login errors.
If you selected Web Login, the Library Item displays different options for different identity providers. If you selected Microsoft Entra ID or Okta in the Identity provider field, enter the redirect URI in the Redirect URI field.
 If you selected OneLogin in the Identity provider field, you must configure a second OneLogin application that uses the POST authentication method, then enter the information from the second OneLogin application in the Client ID (Web Authentication), Redirect URI, and Client secret fields.
  If you selected Other in the Identity provider field, you must configure a second OIDC application that uses the authorization code grant, then enter the appropriate information from the second OIDC application in the Client ID (Web Authentication) and Redirect URI fields. Additionally, if the second OIDC application uses a client secret, enter it in the Client secret (optional) field.
User Provisioning
Configure the user provisioning settings you want to be applied when a user first logs in to the Mac. You can set the default account type and what to do when an account already exists.
Passport uses two attributes of a local Mac user account (which you can view using the dscl command or the Directory Utility app):
dsAttrType:io.kandji.KandjiLogin.LinkedAccount: contains a unique value specific to the IdP account; this varies and could be a number, email address, or unique identifier
dsAttrType:io.kandji.KandjiLogin.LinkedAccountName: contains a value from the RecordName attribute of the linked user account, for example, an email address
Passport also adds an additional value to the RecordName attribute, the email address of the IdP account.
When Passport creates a new local user account, Passport creates the local Mac account with the appropriate attributes and values.
When Passport merges with an existing local user account, Passport adds a value to the existing RecordName attribute, adding the two additional attributes and values to the existing local user account.
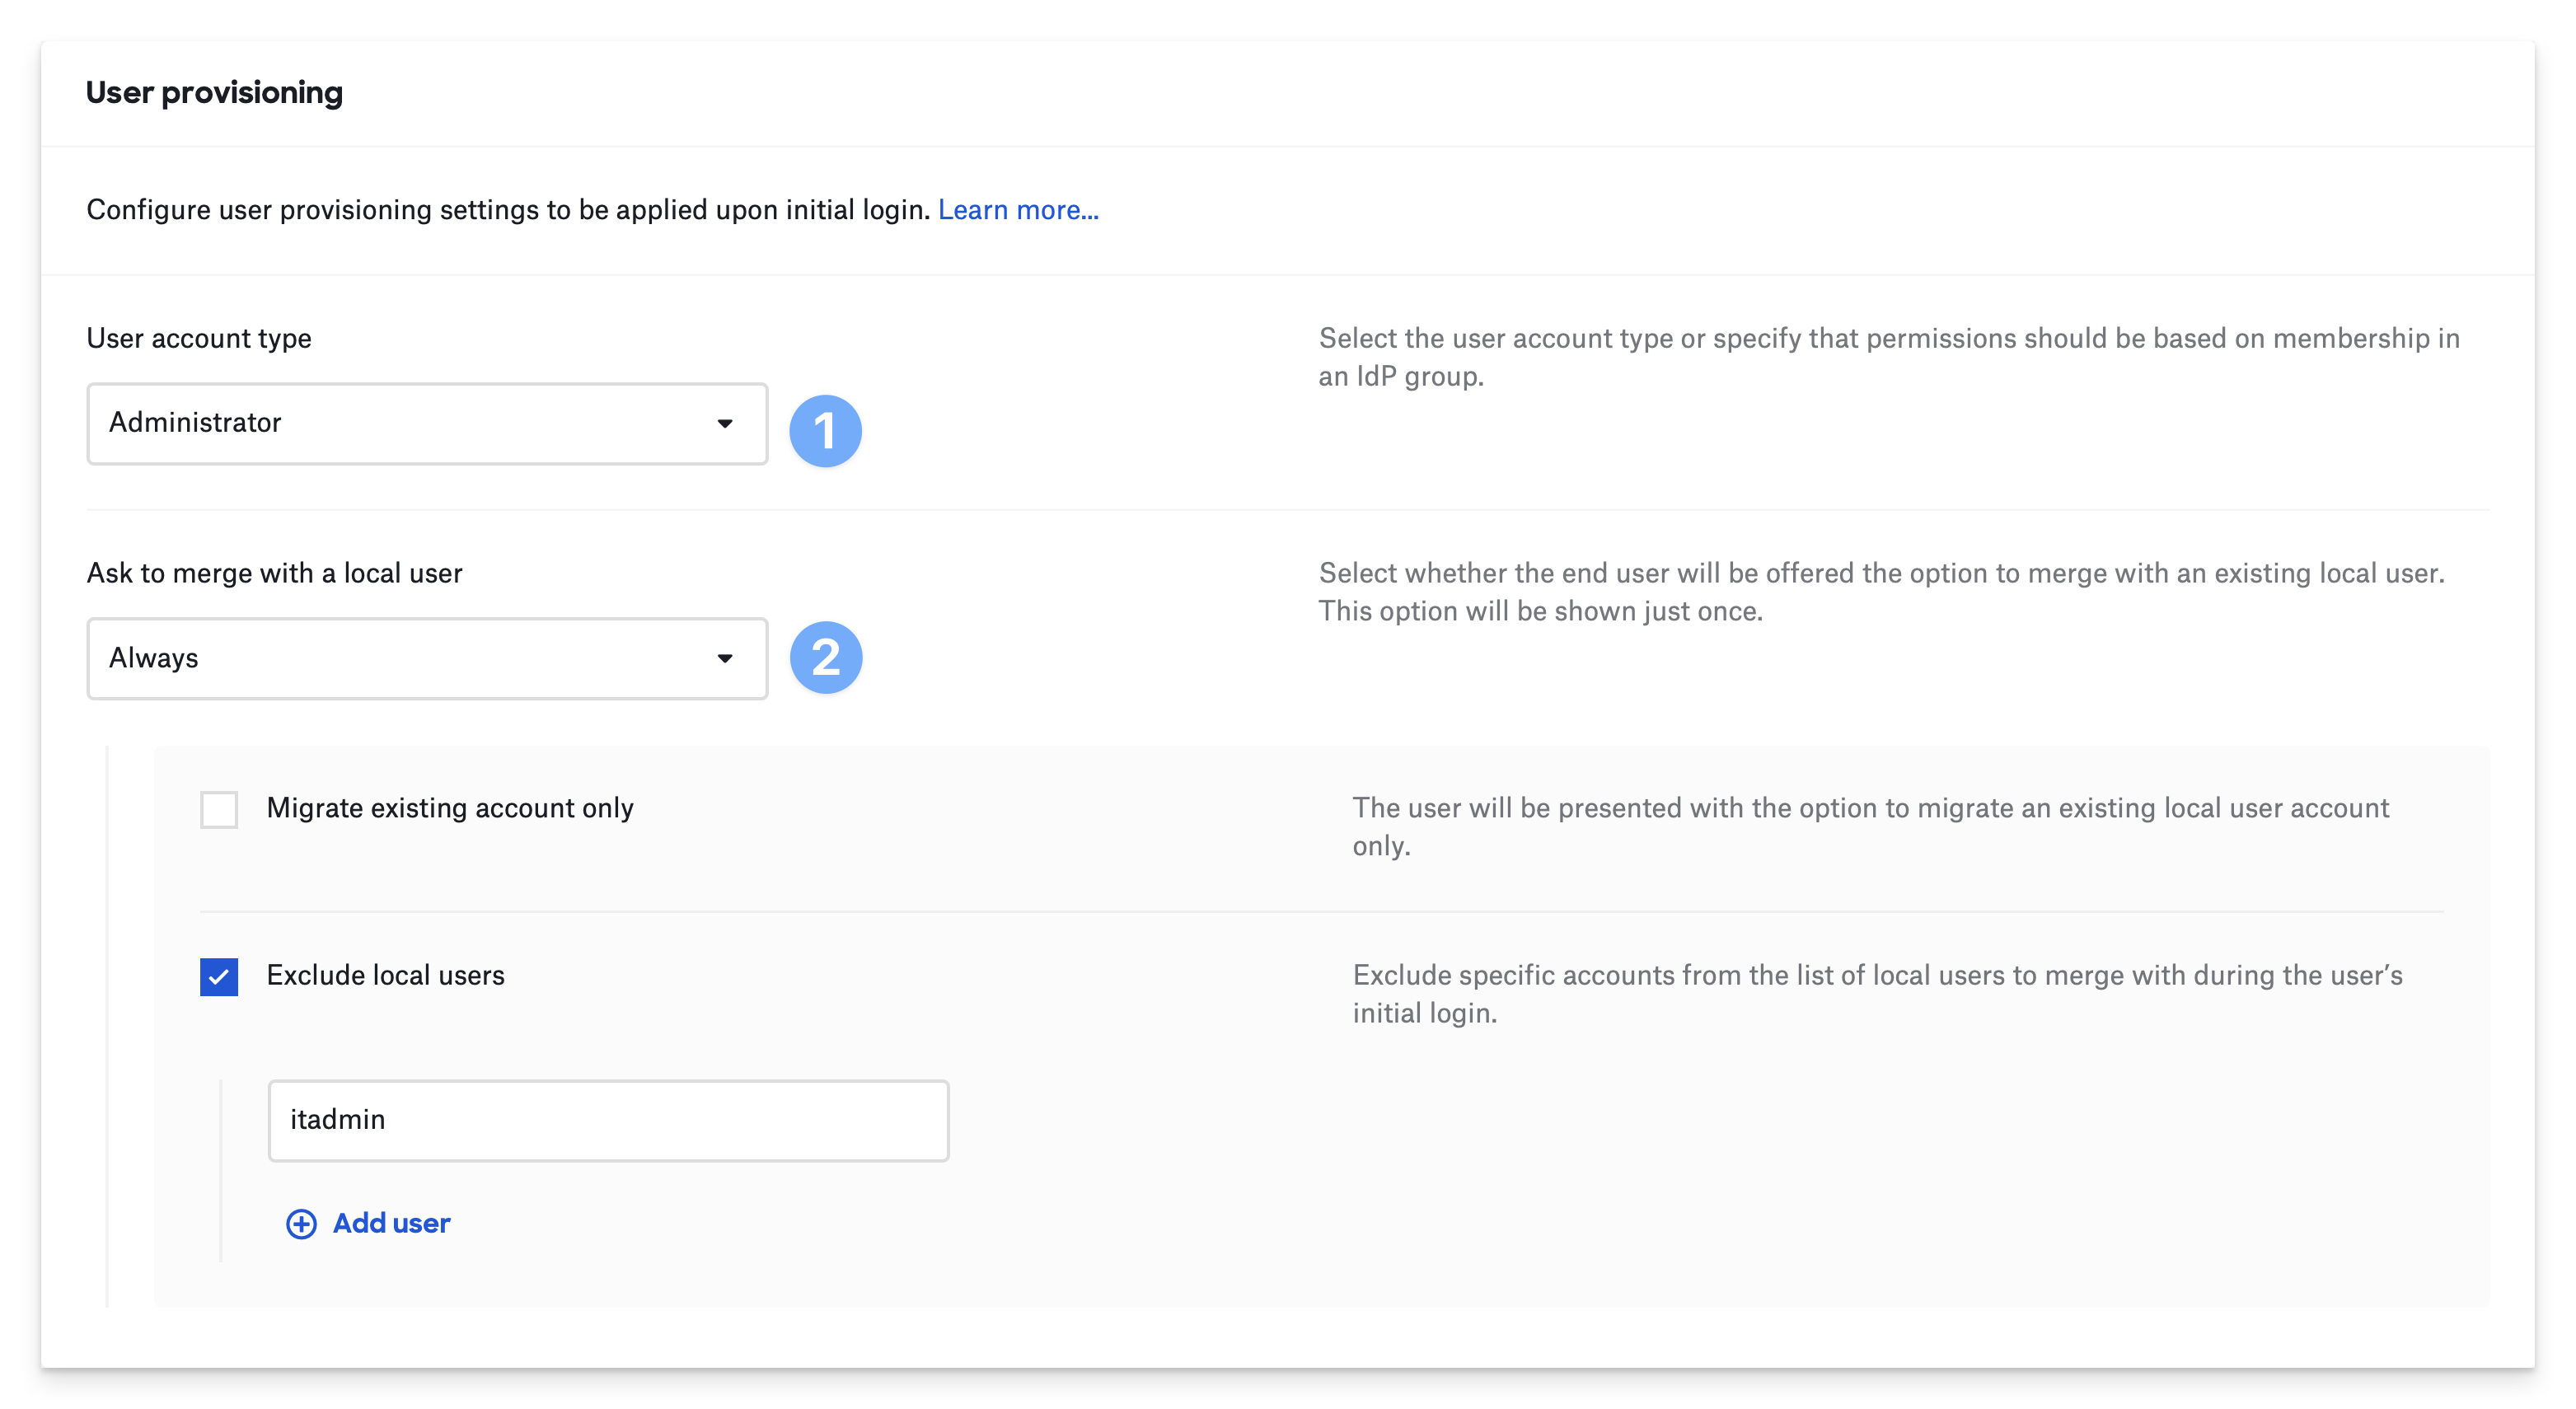
User account type
When new user accounts are created, they can be Administrator (default), Standard, or Specify per identity provider group.
If you select the user account type as Administrator or Standard, then Passport will check a local account's permissions at the initial Passport login.
If you select Specify per identity provider group to configure the new account type based on IdP group membership:
Ensure the group in the Identity provider group field in Kandji matches the group in your IdP
For Microsoft Entra ID, based on Microsoft's recommendations, use the Entra ID group ObjectID instead of the group name.
For Google Workspace, the name entered should be the email prefix of the group in Google as opposed to the name of the group.
If a user is designated as an administrator in one group and a standard user in another, that user's account type will be Administrator.
When using the option to Specify per identity provider group, Passport checks the user's group membership every time the user logs in. Passport updates the user's account type if you make a group membership change or a configuration change that would cause a user to:
change from a standard account to an administrator account
change from an administrator account to a standard account (this change forces the user to restart their Mac to demote the user account and ensure that the change is in effect)
Ask to merge with a local user
When a new user logs in to the Mac, they can be offered the option of merging with an existing account. This option will only be shown once per user on the Mac.
Never. When a user logs in using their IdP credentials, Passport will create a new user account on the Mac, regardless of existing accounts. This is the default setting.
If a local username matches. When a user logs in to the Mac using their IdP credentials, Passport will automatically find the Mac account with a matching username and prompt the user to migrate it. The user will not have the option to migrate to another account.
Always. When a user logs in to the Mac using their IdP credentials, Passport will prompt the user to select an existing local Mac account they want to migrate. This is a good option if you are unsure whether or not your users' IdP account names match their Mac account names. When Always is selected, you will see two additional options:
Migrate existing account only prevents the user from creating a new Mac account; they will only have the option to migrate an existing account.
Exclude local users allows you to list Mac accounts that you do not want the user to migrate. A common use case is preventing the user from being prompted to migrate an IT admin or service account.
Access
Configure which users can log into the Mac and FileVault's automatic login behavior. Our Passport & Managing Passwords article provides in-depth information regarding password management using Passport.
IdP user access
Allow all users to login allows all IdP users to log into the Mac at the Passport login window.
Specify which IdP users can log in allows only users you specify to log into the Mac at the Passport login window.
Automatically include user assigned to device record: Automatically allows the user assigned to the device record in Kandji to log in.
Specify additional IdP users: Allows certain IdP users to log in, even if they aren't assigned to the device record in Kandji.
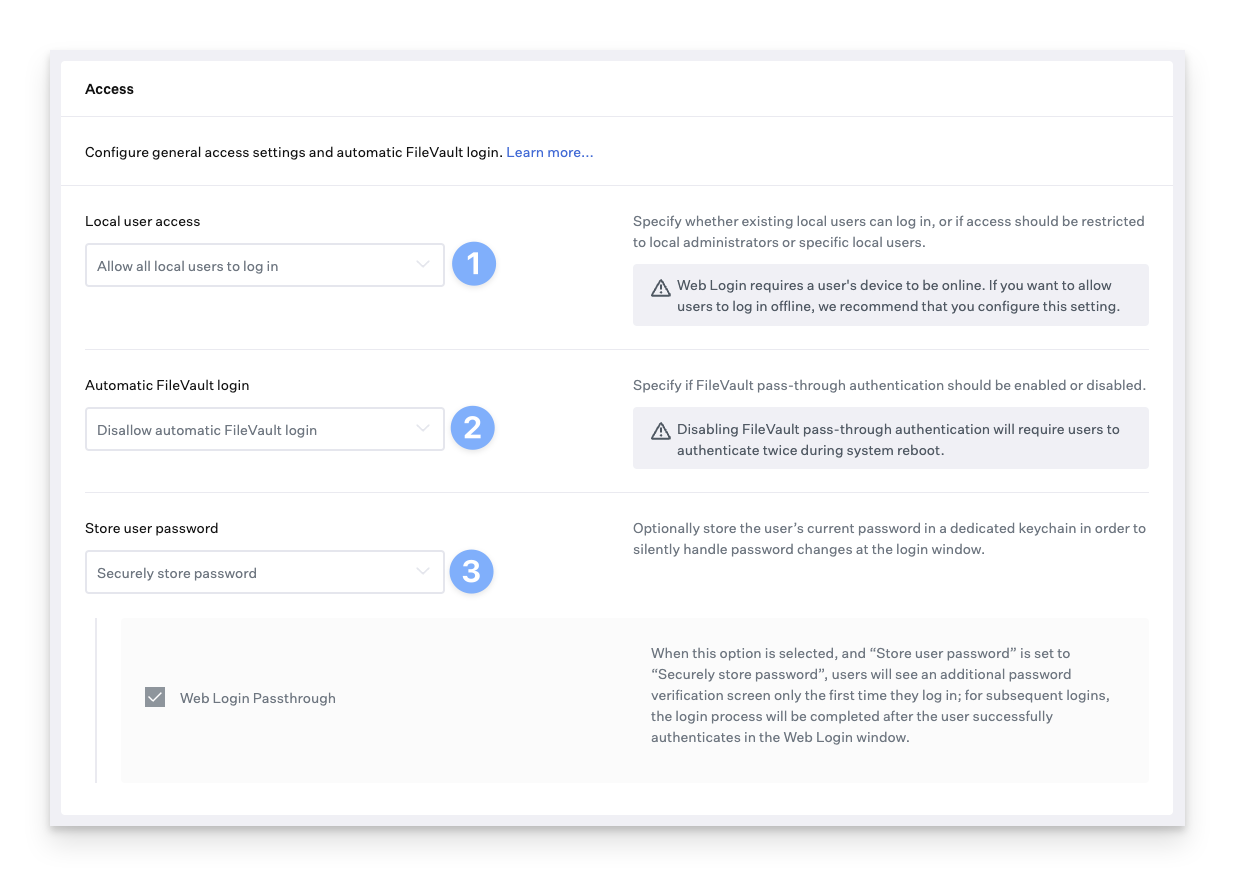
Local user access
Allow all local users to log in allows all local users to log in to the Mac at the Passport login window. If the Mac is connected to a network and can reach the IdP, Passport will check the user's credentials against the IdP. If the Mac is not connected to a network, the user can log in with their local Mac account credentials. This is the default setting.
Allow local administrators to log in allows only local administrator users to log in to the Mac at the Passport login window.
Specify which local users can log in allows only users you specify to log into the Mac at the Passport login window.
Automatic FileVault Login
By default, Allow automatic FileVault login is disabled. This ensures the user is presented with the Passport login window when they turn on their Mac. The user must log in at the FileVault login window and again at the Passport login window.
If Allow automatic FileVault login is enabled, users will log in only at the FileVault login window but will not see the Passport login window unless they log out. The FileVault login window does not check credentials against an IdP.
Store user password
Securely store password: Stores the user's IdP credentials in a dedicated keychain on their Mac to aid in password changes. When the user changes their password with their IdP and then logs in to the Mac, they only need to enter their new credentials; Passport will silently update the Mac password. If a user is already logged in and changes their password with the IdP, Passport will prompt them within 5 minutes to update their local password, and the user will not have to provide their local password; they will only have to enter their IdP password for Passport to change their local password to match their IdP password. The location of this keychain is /Library/Keychains/kandji.keychain. If you remove that keychain, Passport will automatically create a new keychain in that location and use it without generating an error or notification to the user.
Web Login Passthrough: When this option is selected with Web Login, users will see an additional password verification screen only the first time they log in. The login process will be completed after a single authentication at the Web Login window on subsequent logins.
Do not store password: With this option set, Passport only checks and enforces password synchronization at login. If a user changes their password in between login sessions, their local password will remain out of sync until their next login.
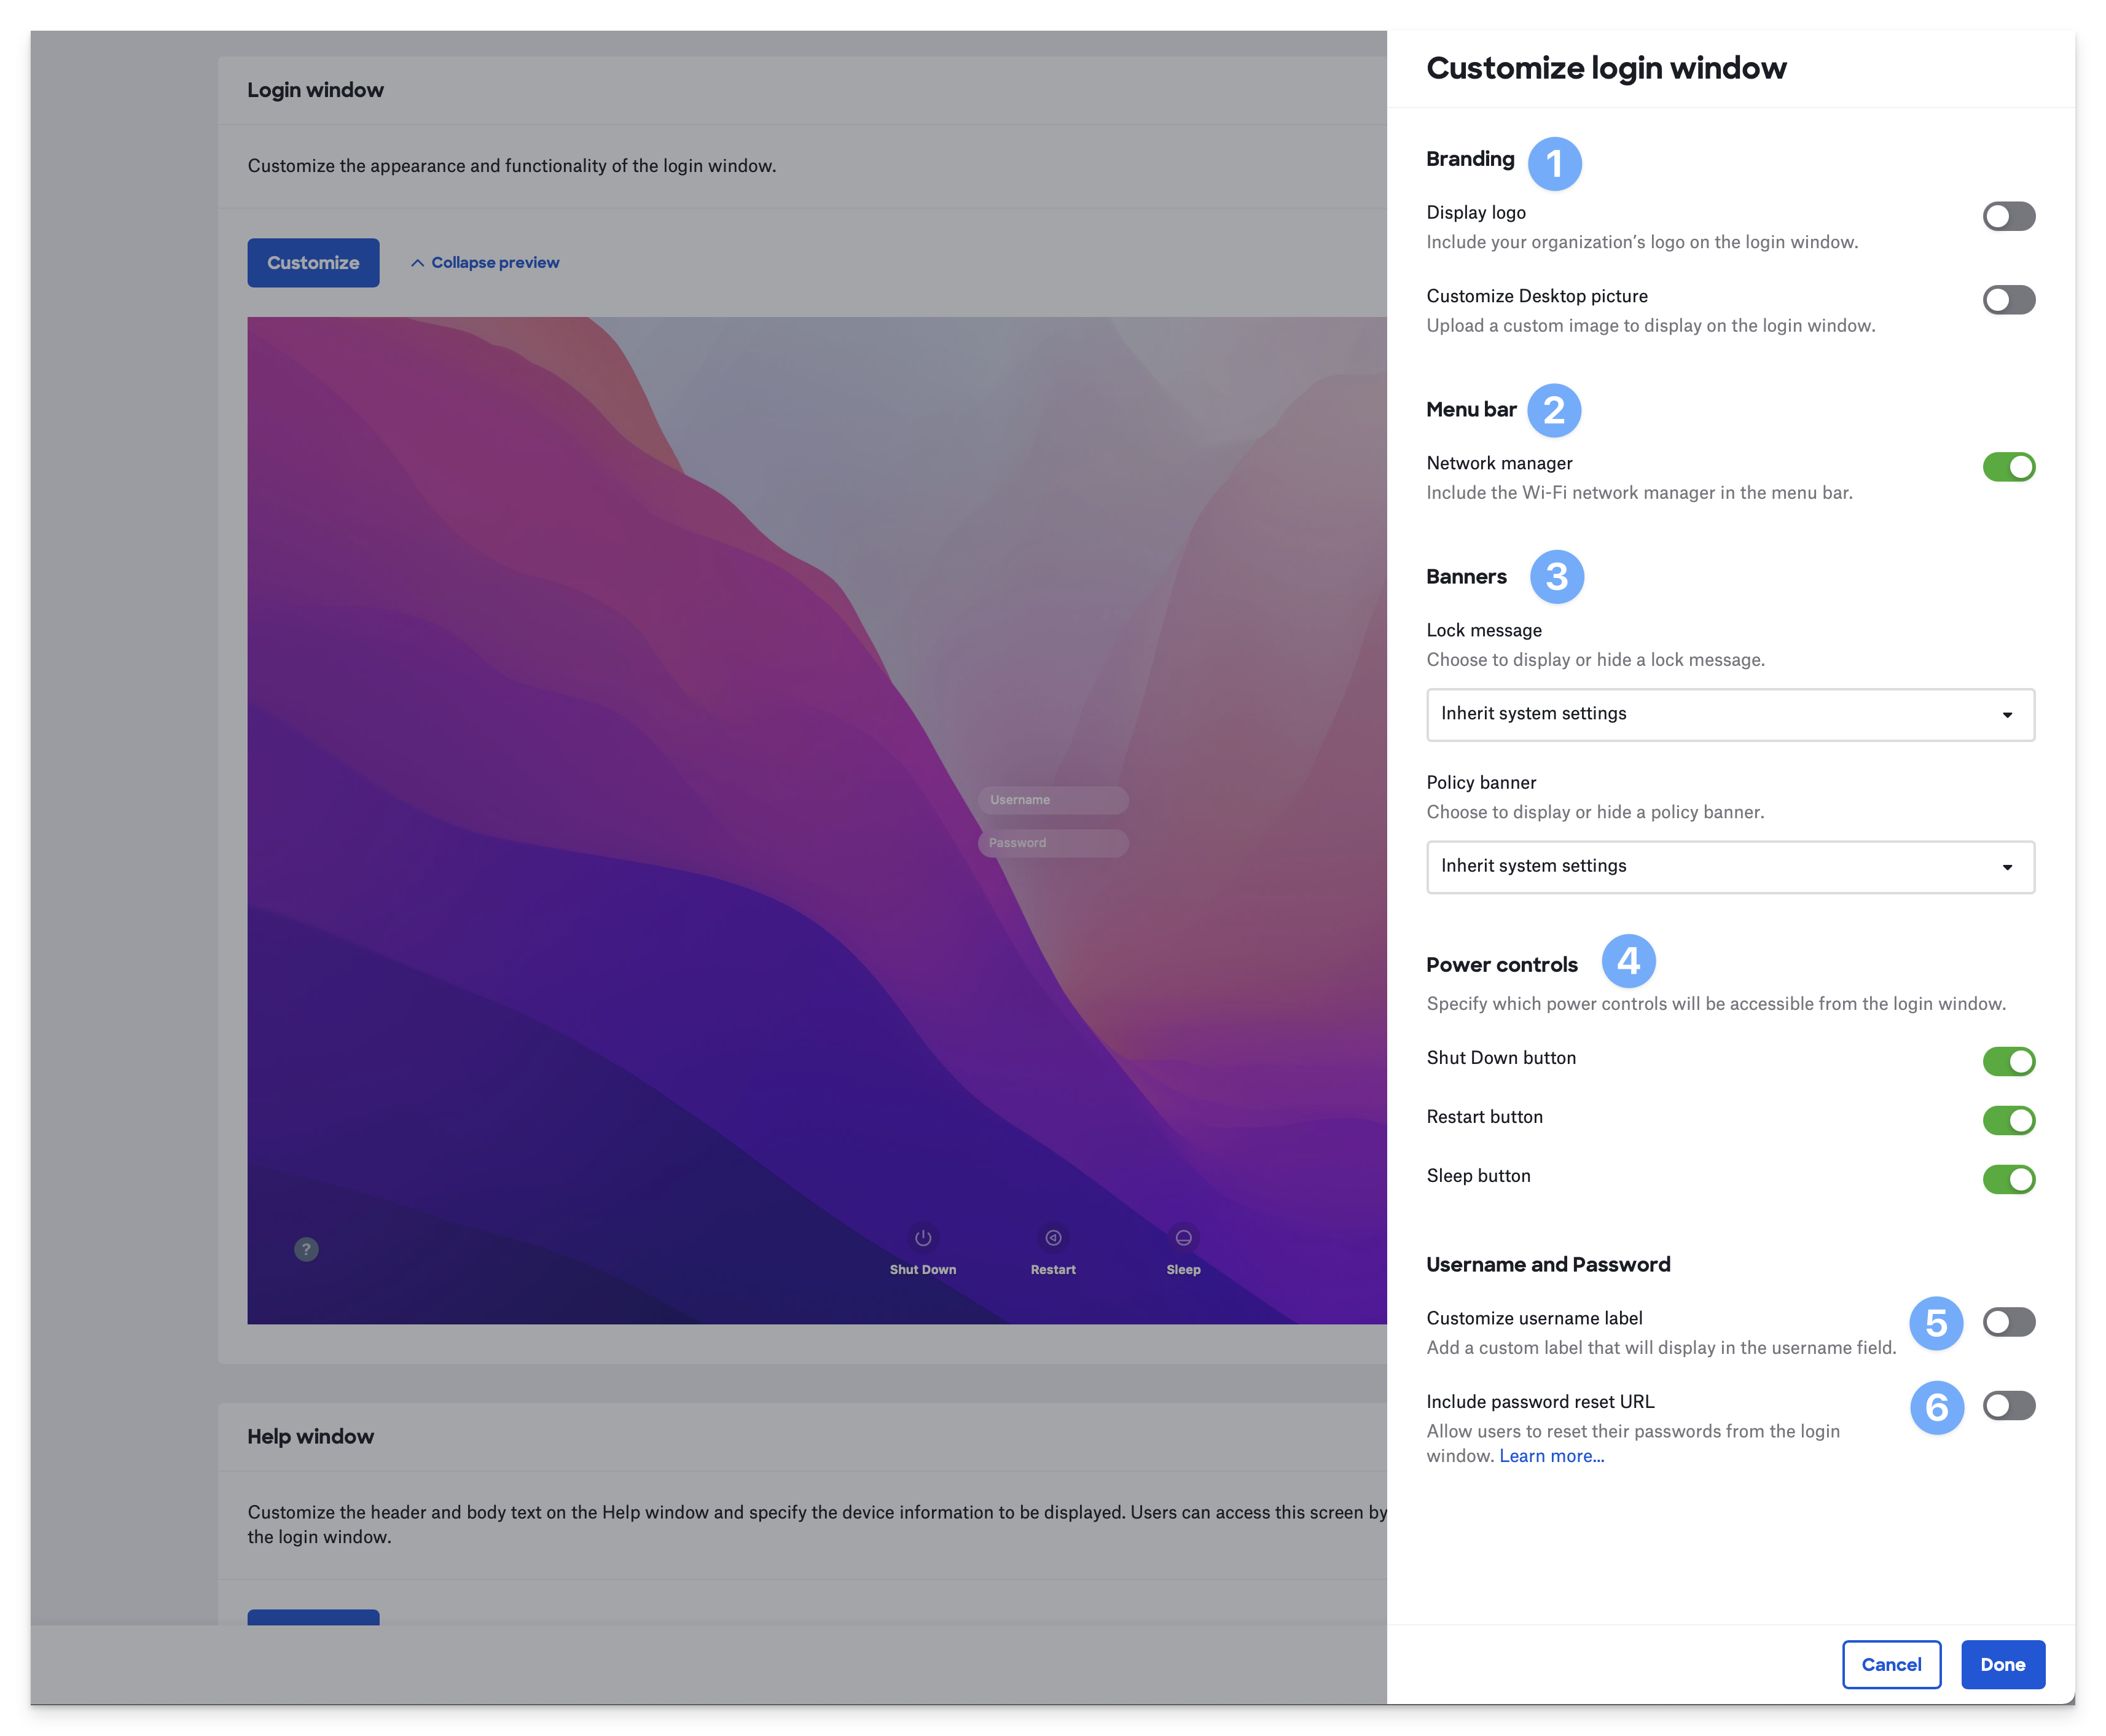
Customize Login Window
You can customize the Passport login window for your users. Click Customize to reveal the Customize login window drawer with the following options:
Branding
Display logo: If you configure your Passport Library Item to use the Web Login authentication mode, Passport displays the web view window instead of the logo. If the user clicks the Local Login button, Passport displays the logo along with username and password fields, instead of the web view window.
Customize Desktop picture: A 3840x2160 pixel image is recommended for a background image file.
Menu bar (defaults to enabled) The default setting will display the Wi-Fi menu, allowing users to connect to Wi-Fi at the Passport login window if they aren't already connected.
Banners (defaults to Use system settings)
Lock message
Policy banner
Power controls (defaults to display all power controls)
Shutdown button
Restart button
Sleep button
Username
Customize username label: Enter a custom label for the username field to help users know which credentials to enter at the Passport login window.
Password
Include password reset URL: Provide users with a URL to reset and update their IdP password.
Customize Help Window
In the bottom left of the Passport login window, users can click the Help icon to display a Help window. You can customize that Help window. Click Customize to reveal the Customize Help window drawer with the following options:
Support tab: The Support tab allows you to enter a custom header and body text. This is a great place to explain the Passport login window and how to contact the help desk or get support.
Device info tab: Device information is great for troubleshooting and determining what Mac a user is working on. You can enable:
Serial number
IP address
Hostname
macOS version
Model information
About: Displays the version of Passport running on the Mac.

Testing Passport
When testing Passport, you can use the command sudo kandji library to force the new Passport Library Item configuration to be applied after making changes.
You can delete a user account associated with Passport using the Users & Groups settings (or Users & Groups preferences).
After you've performed these steps, you can safely log out and then attempt to log in again with new Passport settings using the credentials of a test IdP user account.