Okta Desktop Password Sync is currently in Okta "Early Access" release. See Okta's resource: Manage Early Access and Beta.
Requirements
Okta Requirements
Your Okta Identity Engine org is available.
Your macOS computers are running a minimum of macOS Ventura 13.
Support for Platform SSO 2.0 is available for macOS computers using macOS 14 Sonoma and later. Platform SSO 2.0 allows users to use Desktop Password Sync directly from the macOS login window.
The Desktop Password Sync application is available for your organization in Okta. If you can't locate the Desktop Password Sync app in the app catalog, contact your Okta account representative.
The Okta Verify authenticator is set up in your org.
The Okta Verify app added to your Kandji tenant from Apple Business Manager Apps & Books (See Kandji guide here).
Additional Requirements
A plain text editor such as Visual Studio Code, Sublime Text, BBEdit, etc.
Three mobileconfig files that will be edited and uploaded to Kandji as Custom Profiles.
FileVault Support for macOS 15+
Okta has new authentication policies available to enforce stronger authentication requirements for macOS 15+. The Desktop Password Sync experience now includes the FileVault interface. You can read more about this in Okta’s Configure Desktop Password Sync for macOS 15 article.
Create Device Access SCEP Certificates for macOS 14+
Configure a Desktop SCEP Certificate Authority in Okta
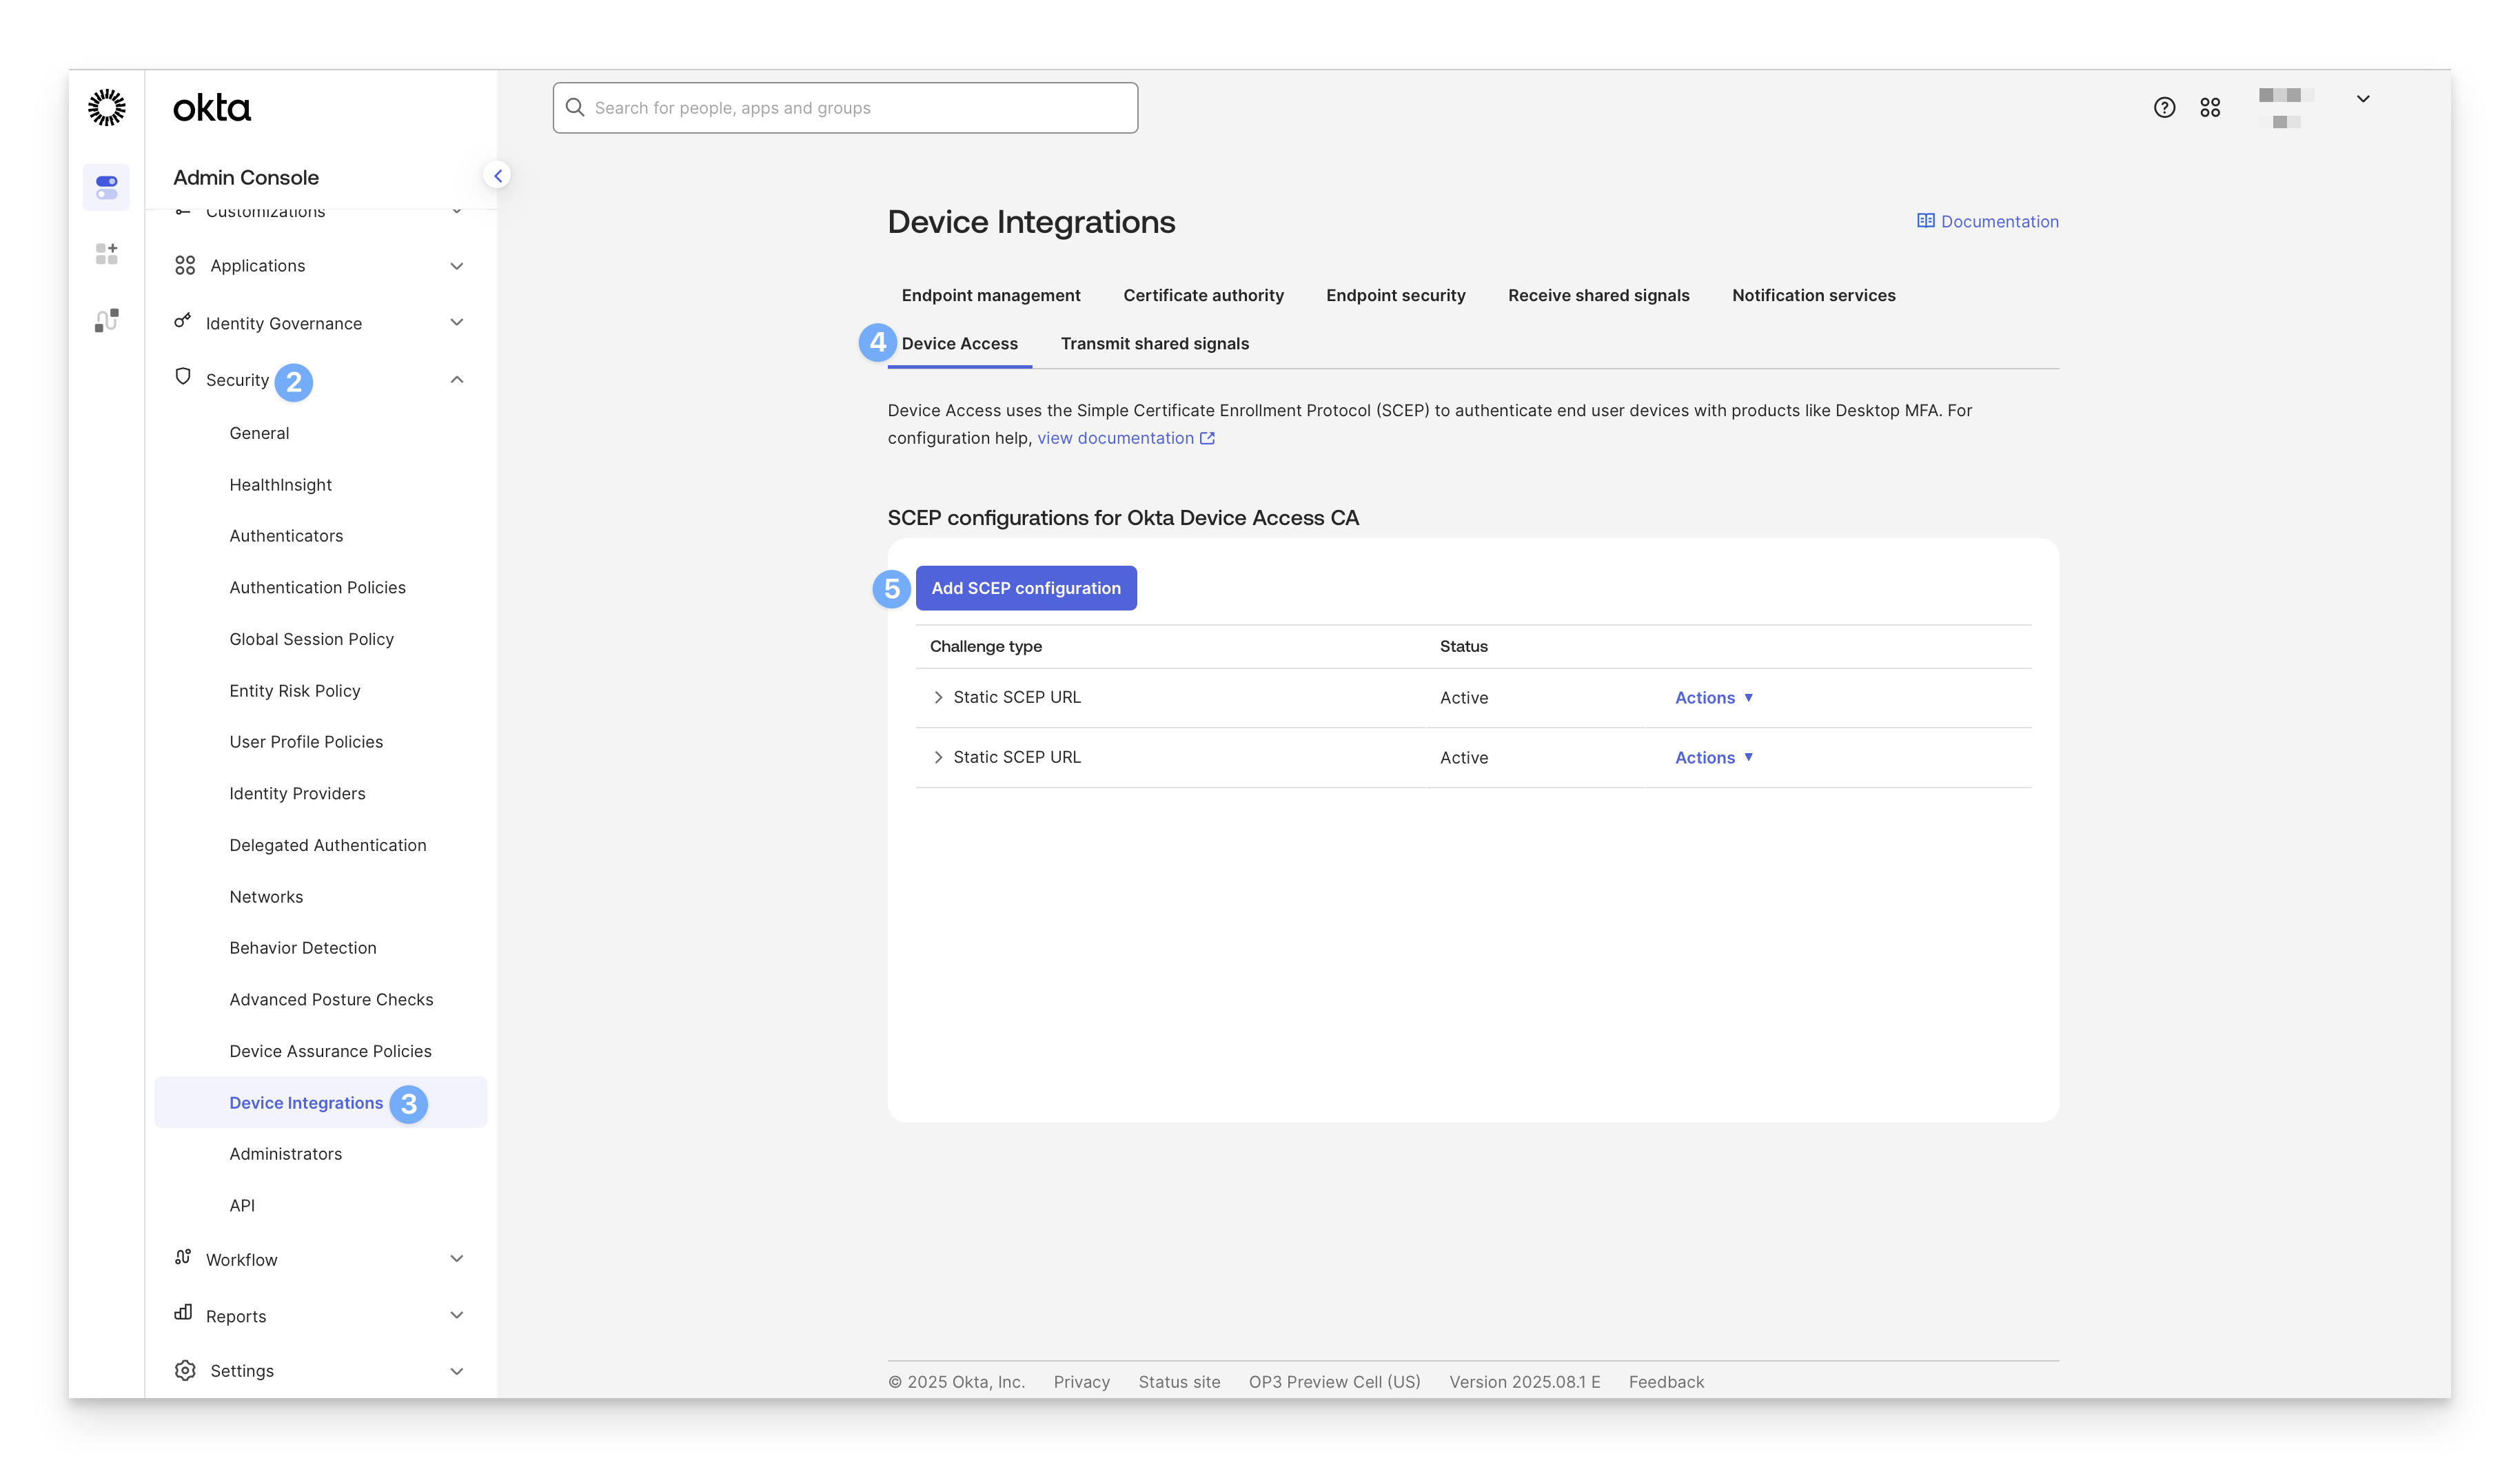
Log in to your Okta admin portal.
In the left-hand navigation, select Security.
In the expanded menu, select Device Integrations.
In the Device Integration pane, select Device Access.
Click Add SCEP configuration.
Select Static SCEP URL.
Click Generate.
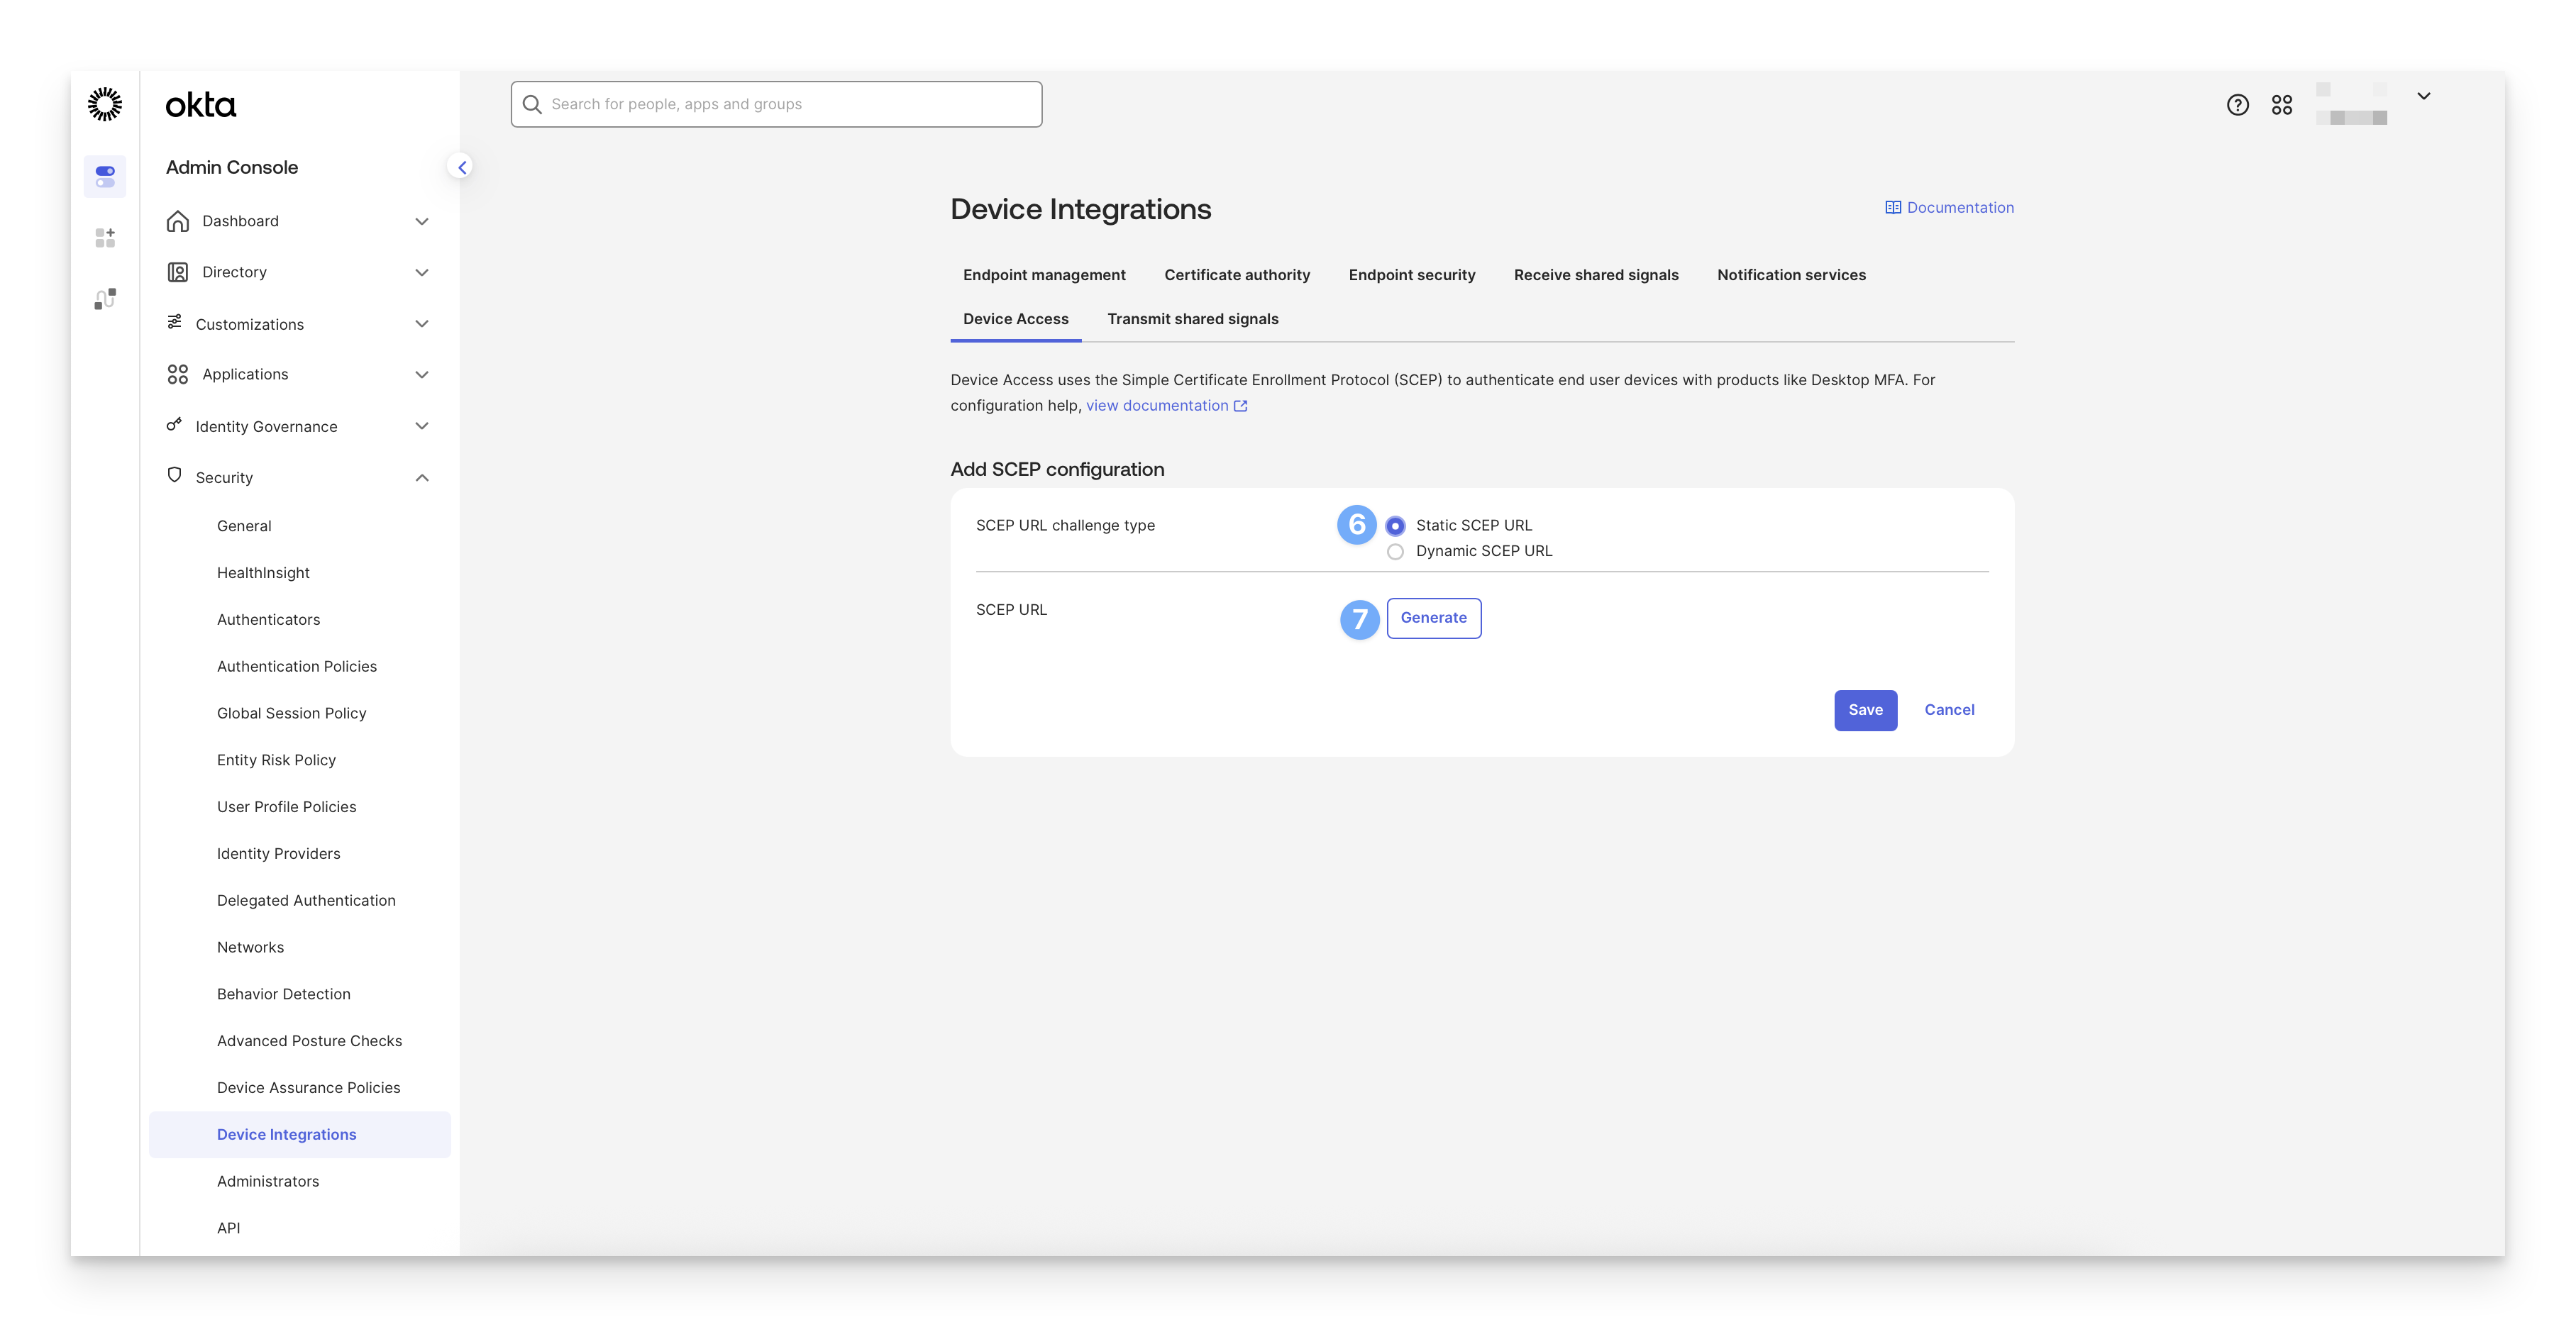
Copy the SCEP URL.
Copy the Secret key.
Make a note of the secret key, as this is the only time you will be able to view it. After this, it will be stored as a hash for your protection. If needed, this key can be rotated.
Click Save.
If you need to Reset the secret key, you can do so from the Actions menu to the right of the integration.
.png)
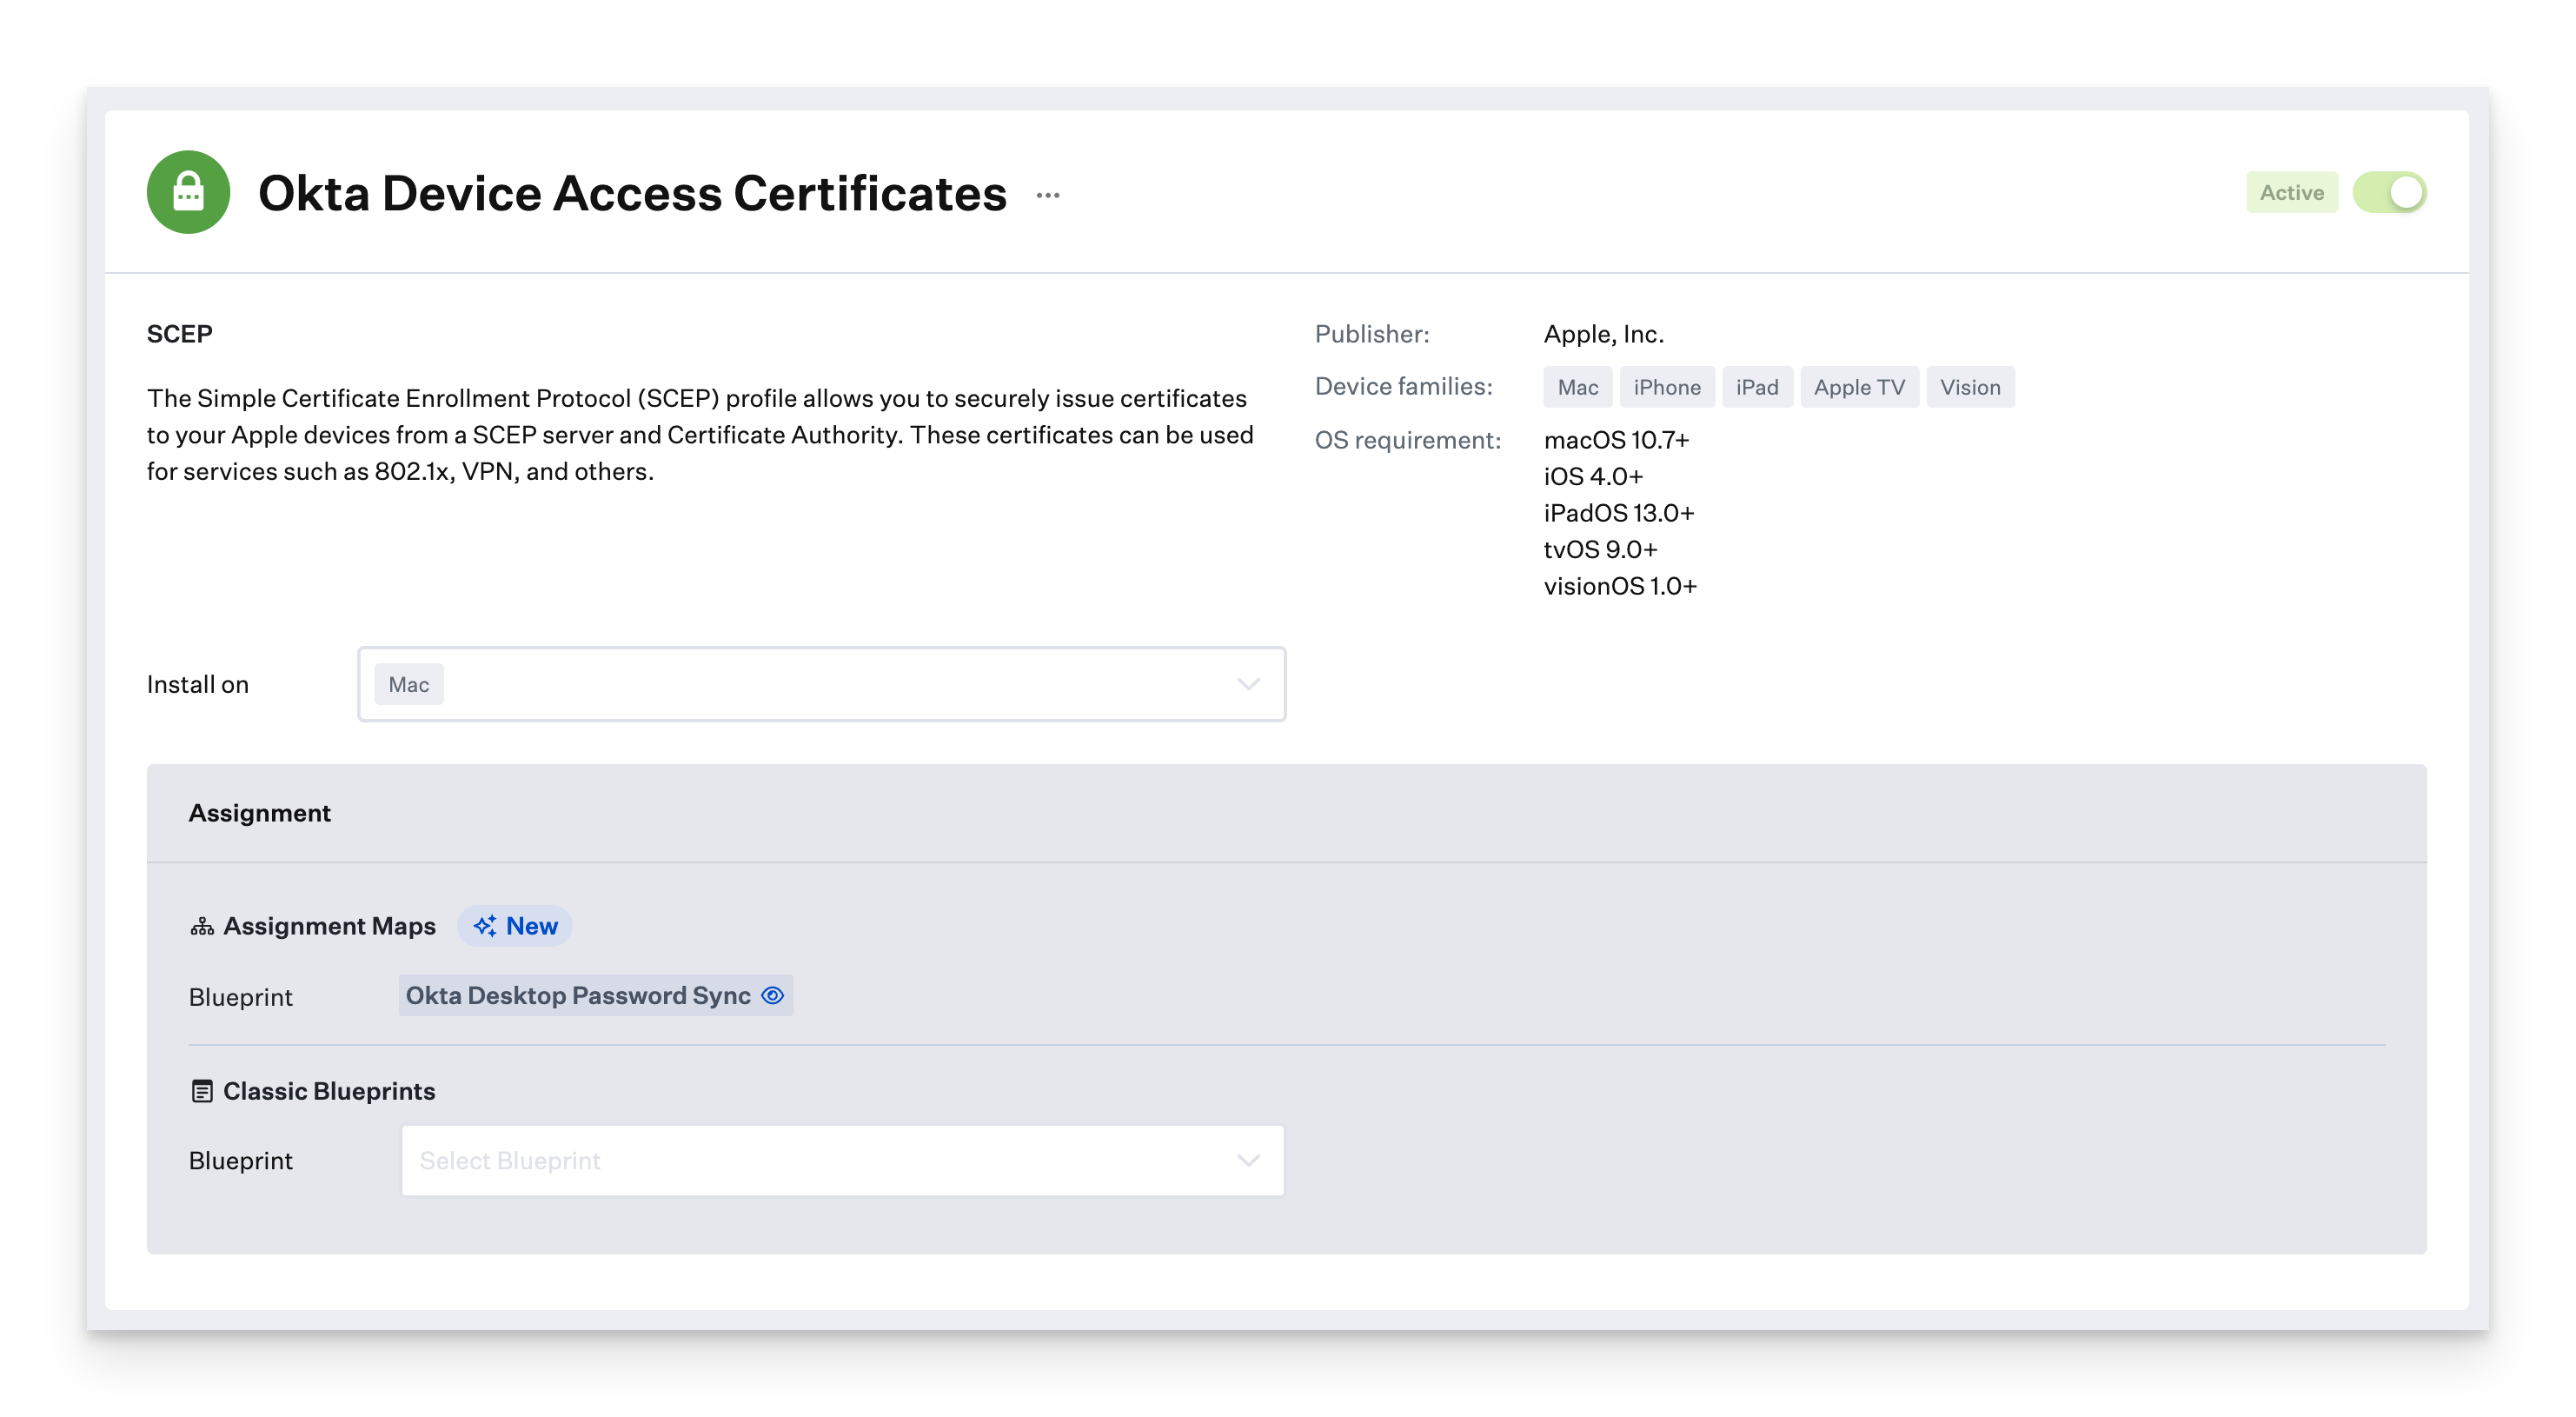
Add the SCEP Payload to Your Kandji Library
To add this Library Item to your Kandji Library, follow the steps outlined in the Library Overview article.
Configure the SCEP Certificate Profile
Give the profile a name.
Assign it to your desired Blueprints.
In the URL field, paste the SCEP server URL you copied earlier.
Enter a Name (optional).
In the Challenge field, paste the secret key you copied earlier.
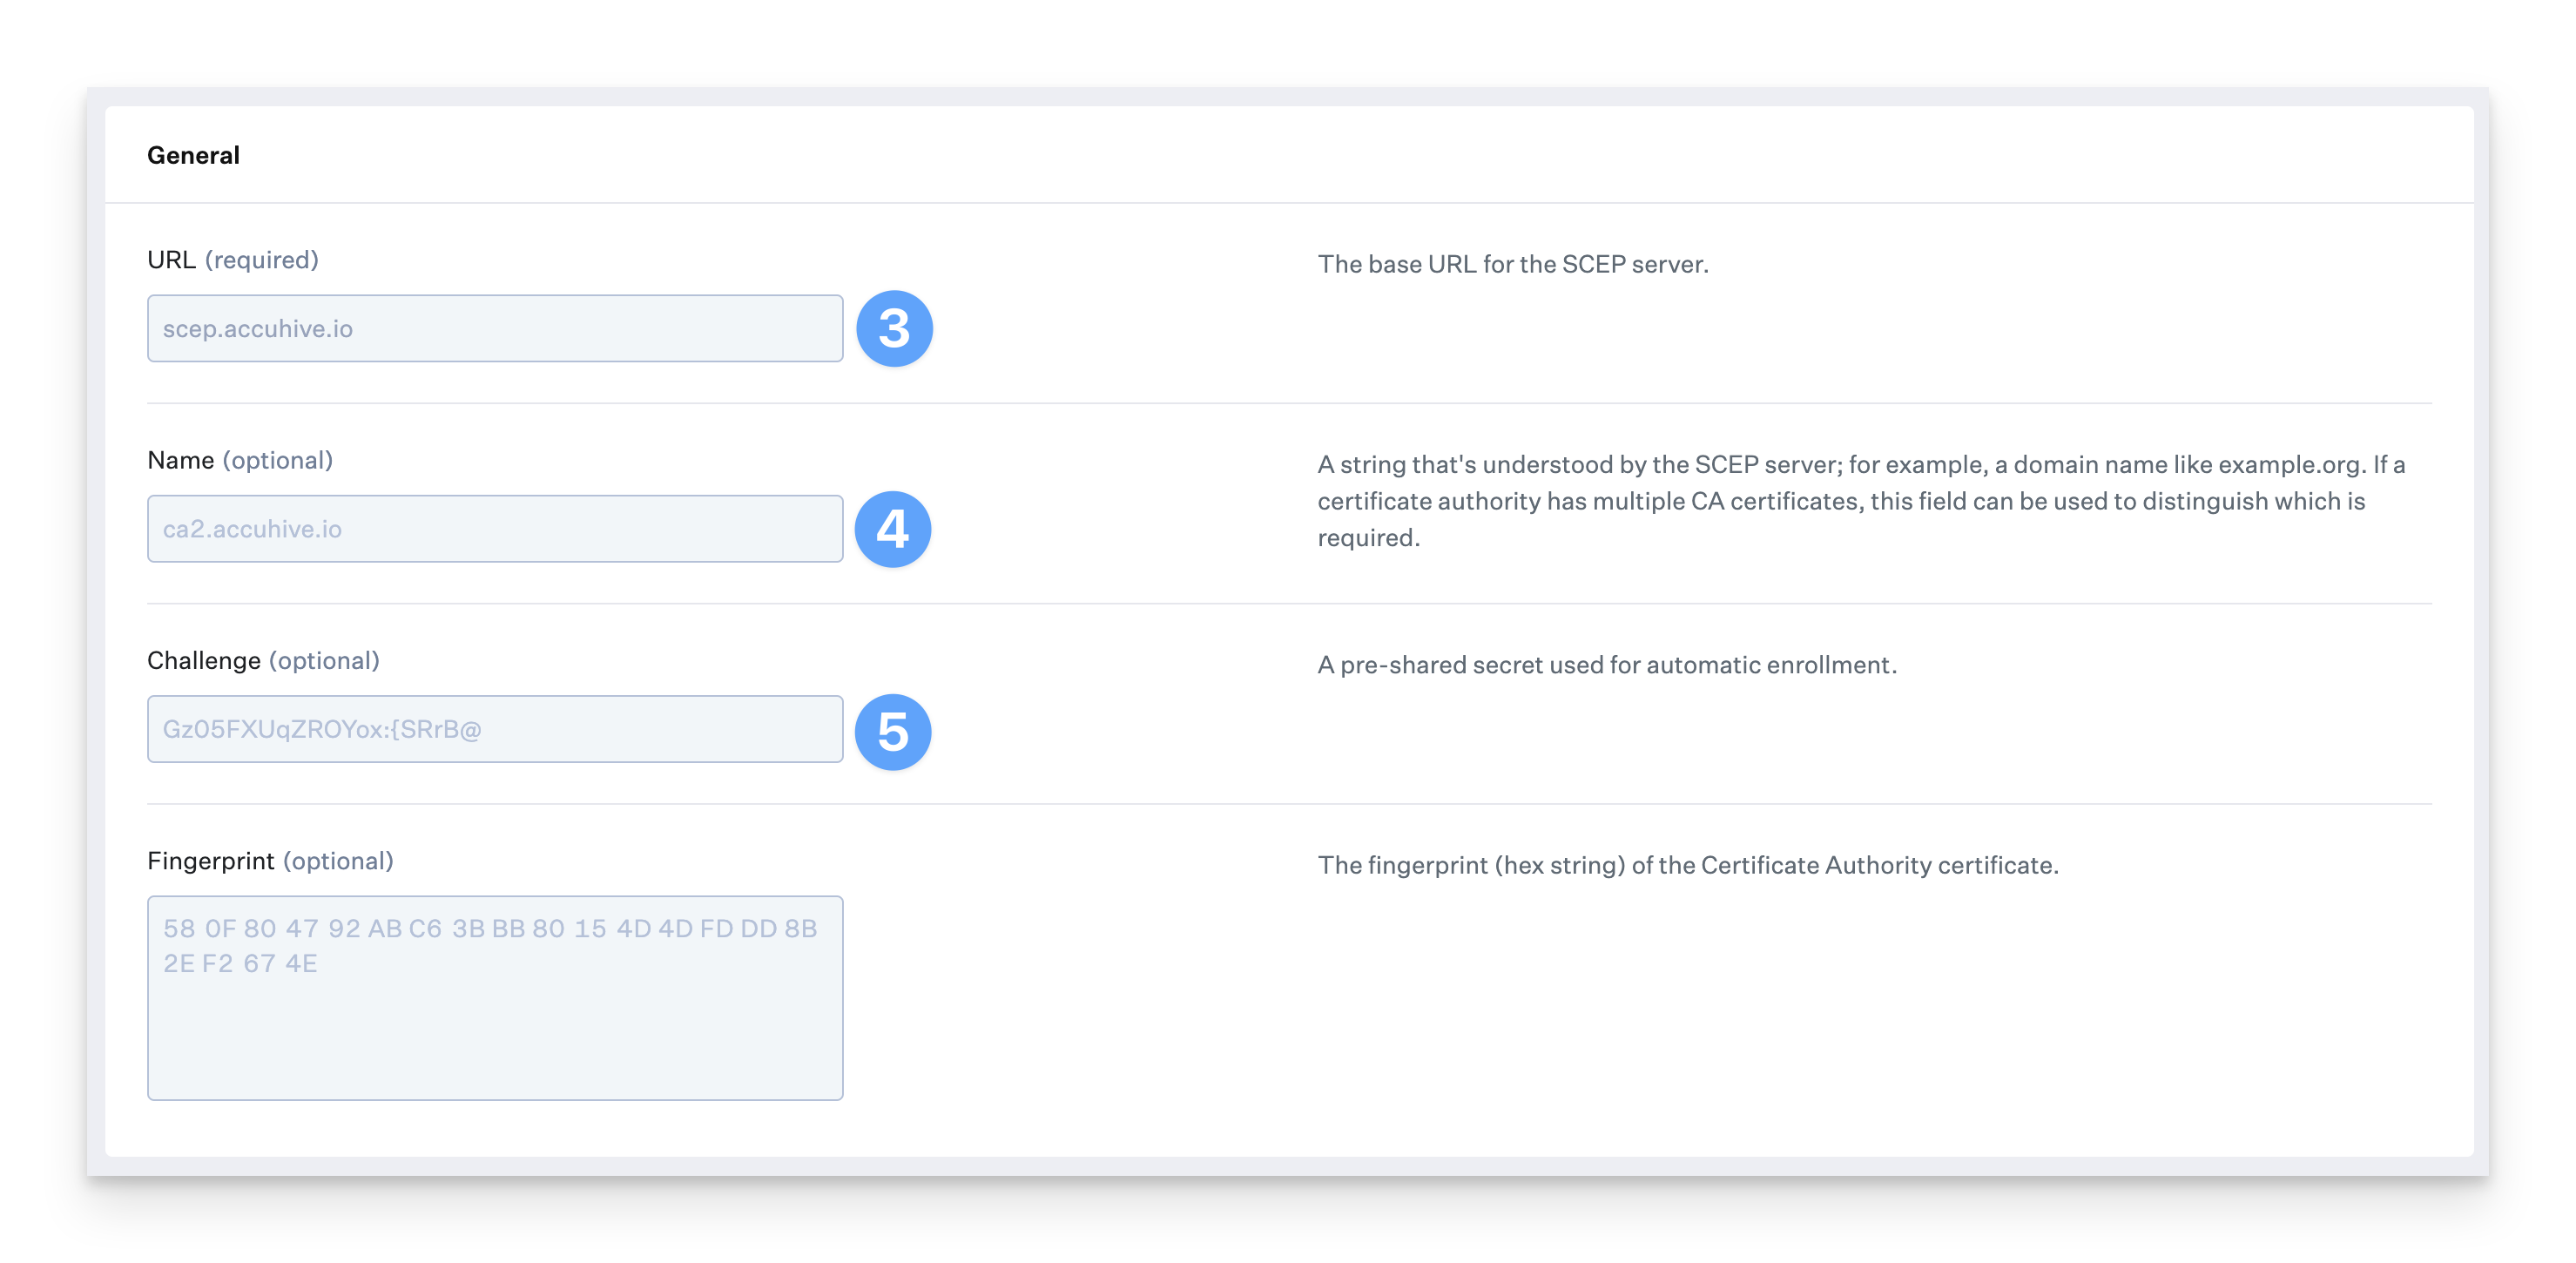
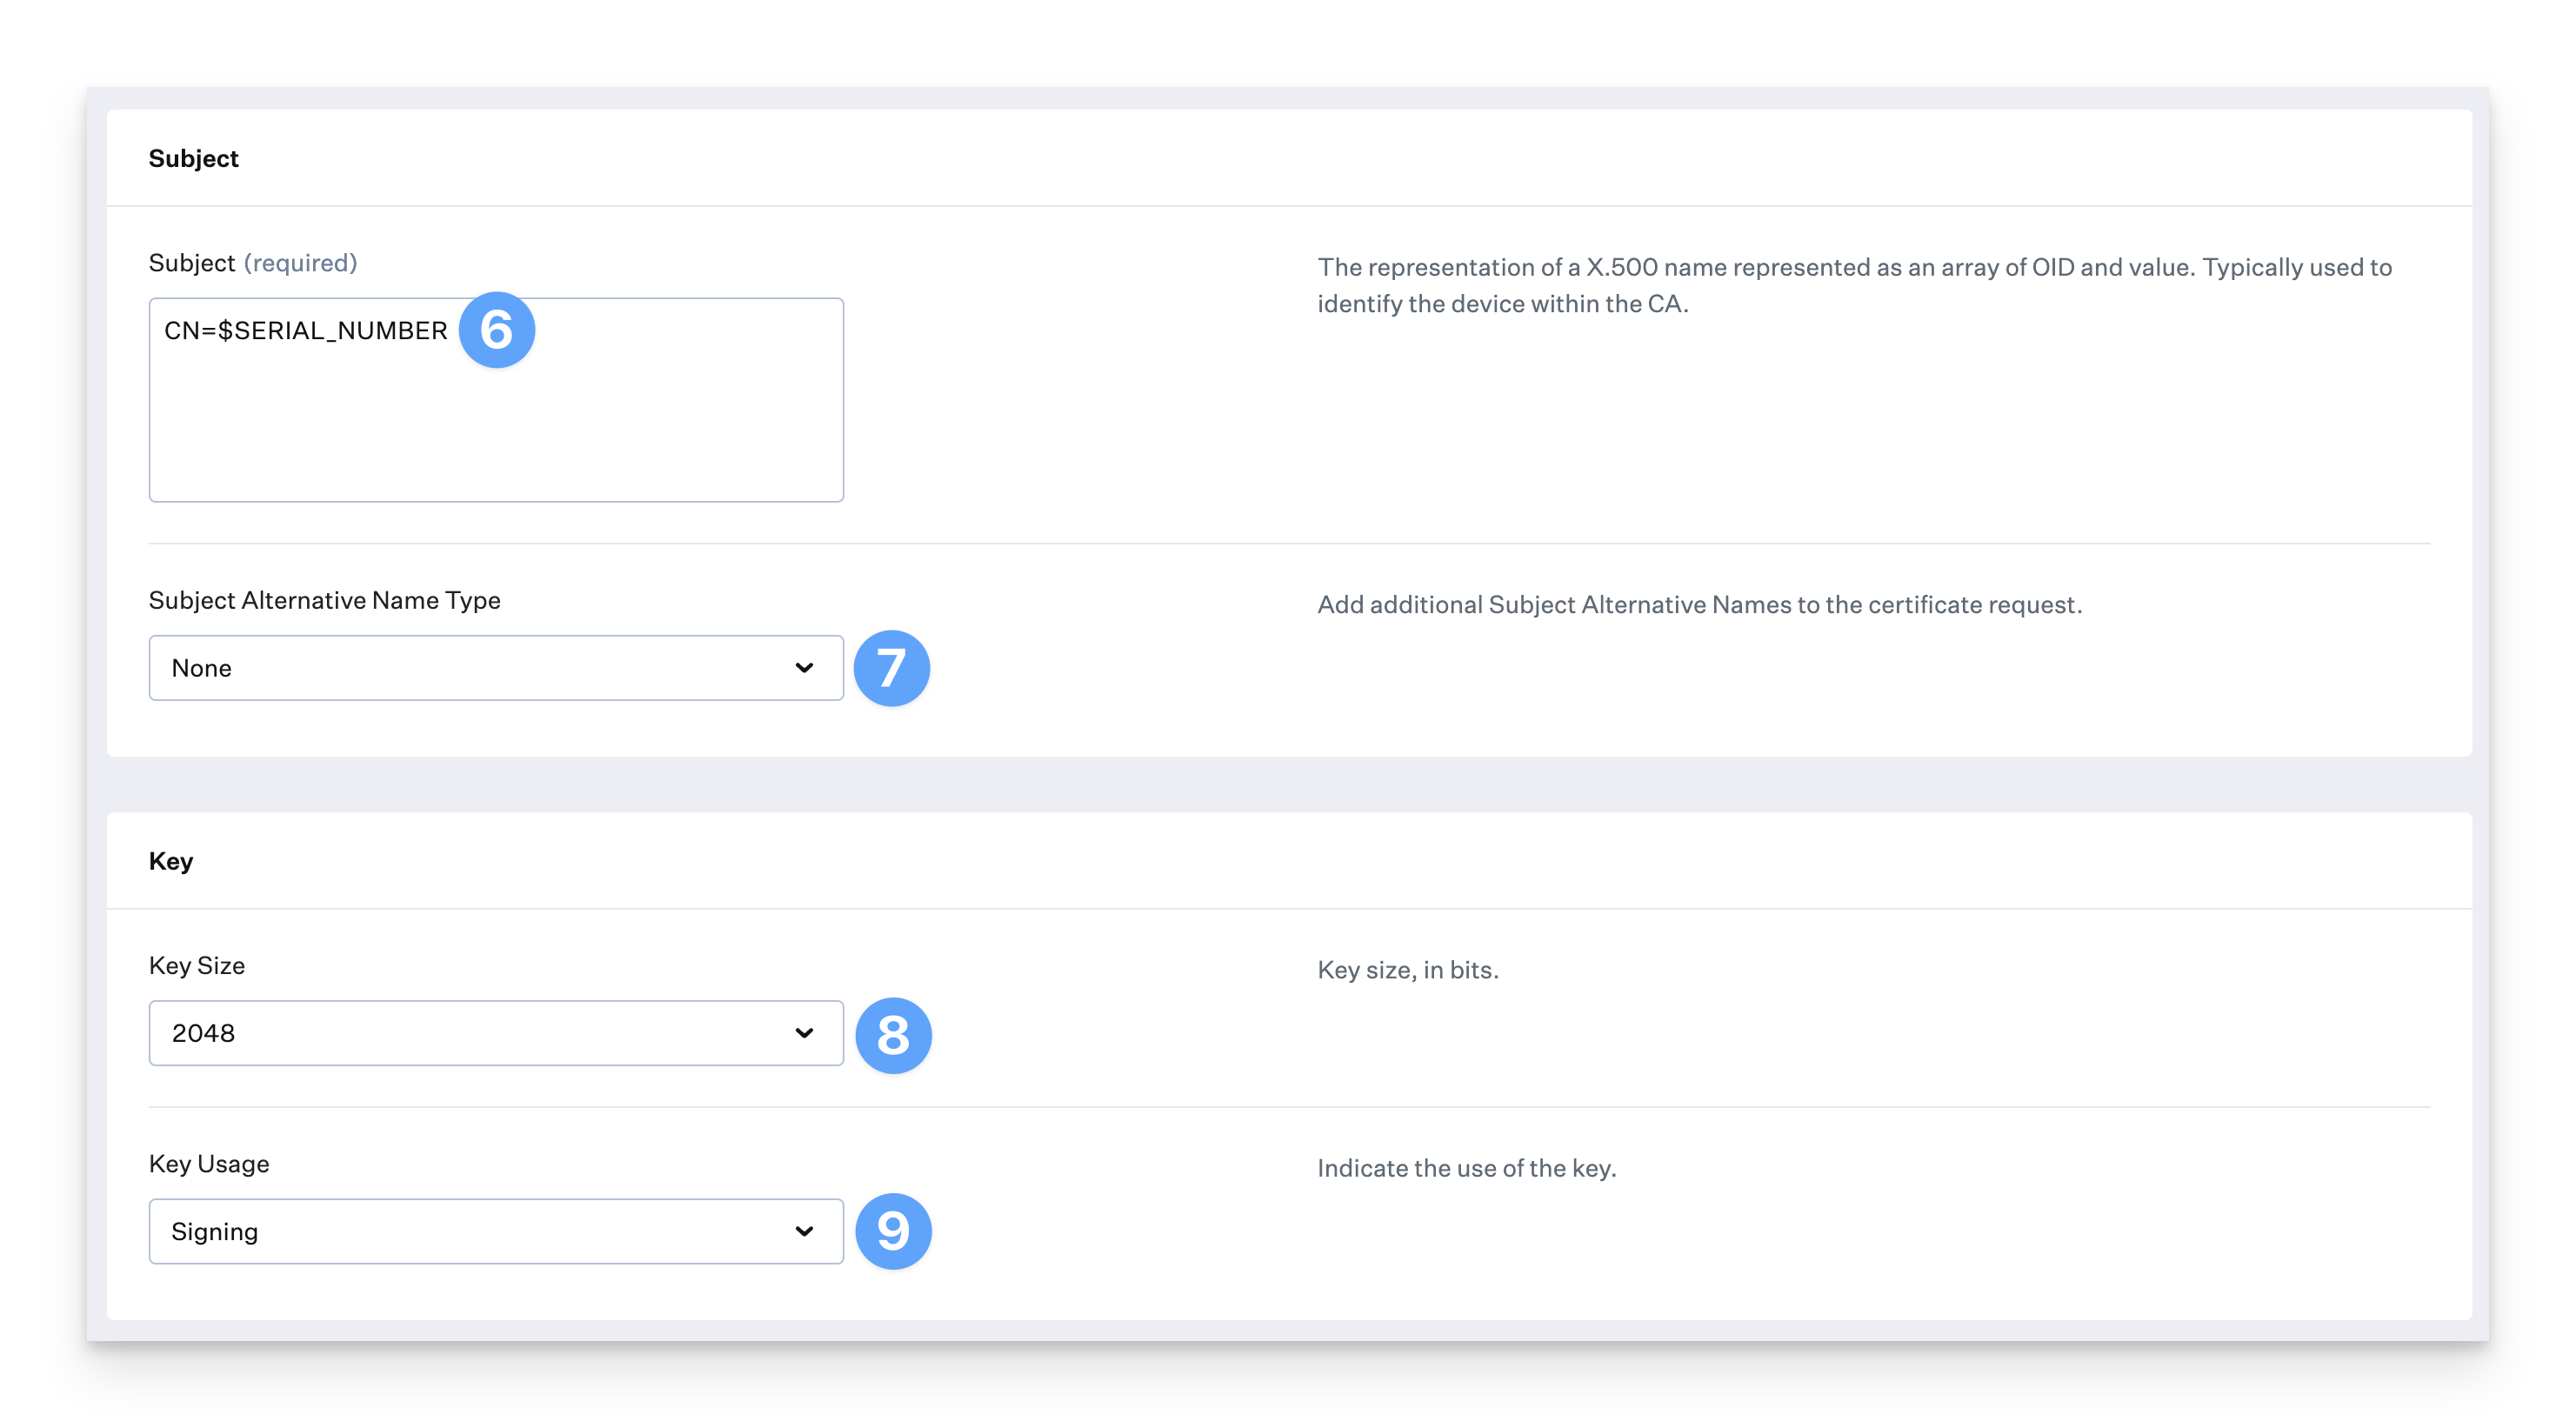
In the Subject field, enter CN=$SERIAL_NUMBER.
Upon saving the SCEP Library Item, Kandji will append the PROFILE_UUID to the end of the CN used.
Ensure that Subject Alternative Name Type is set to None.
For Key Size, select 2048.
For Key Usage, select Signing.
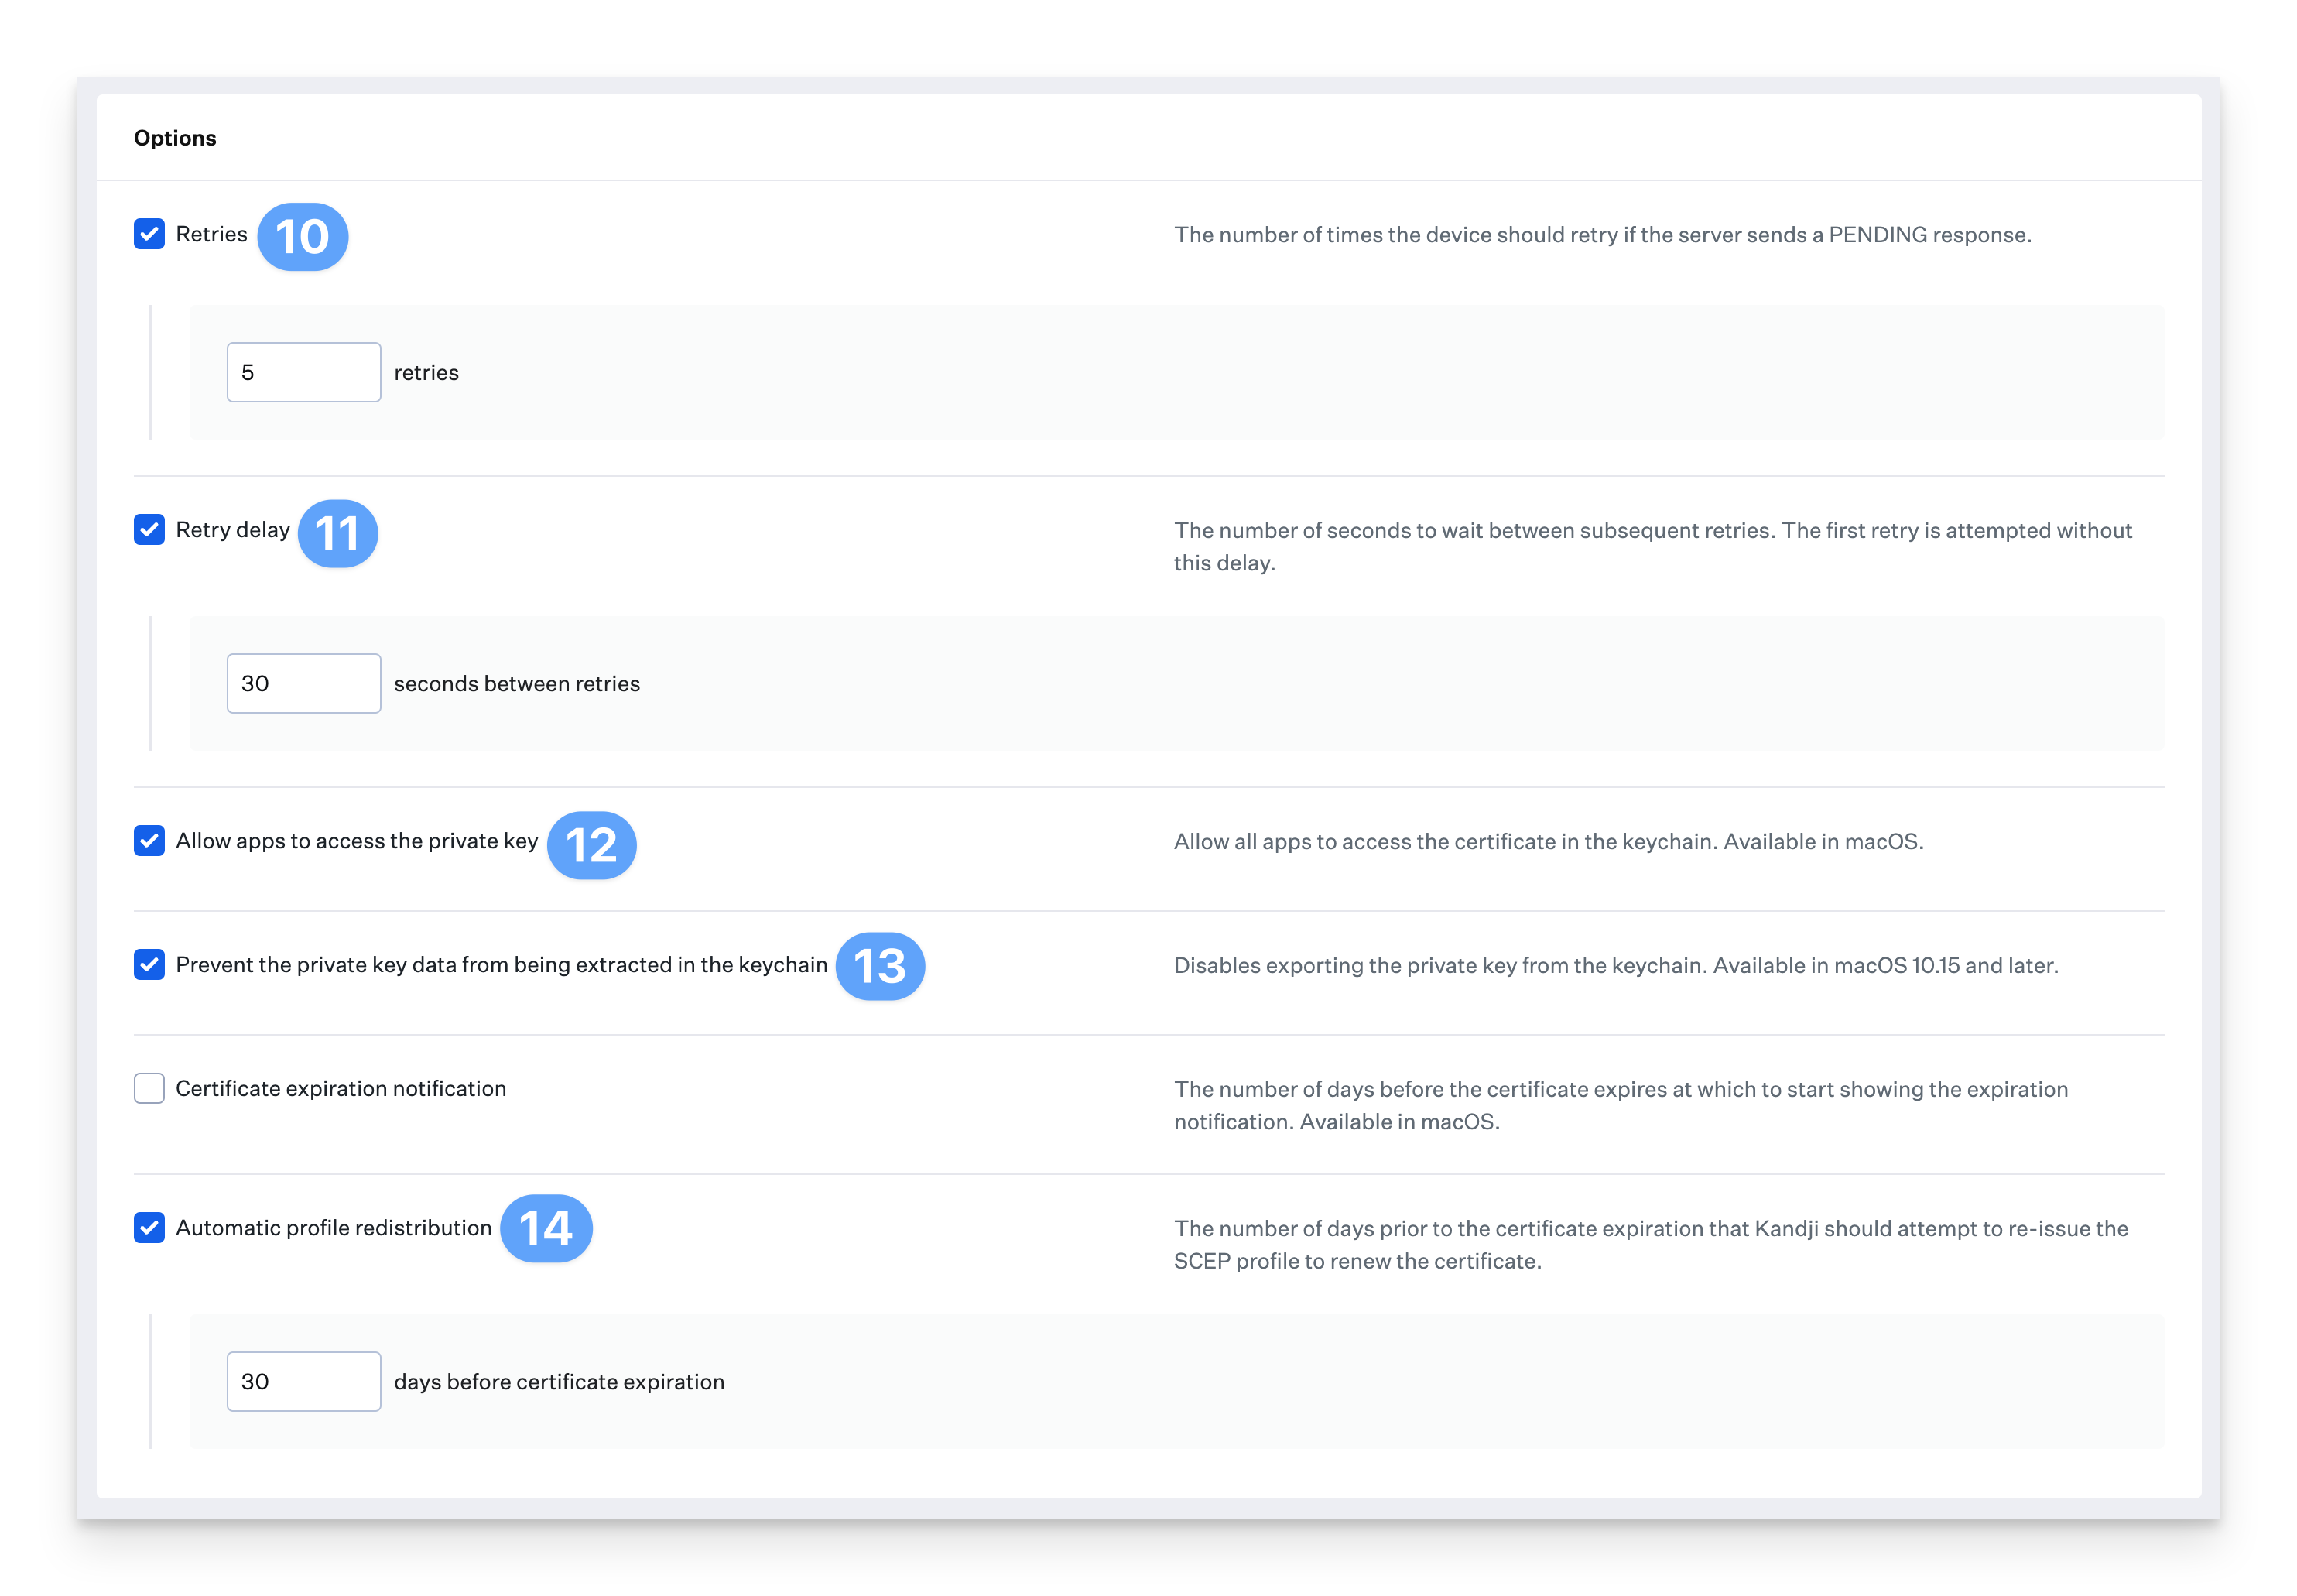
Select Retries and enter 5 for the number of retries. This number can be adjusted to a value that's appropriate for your environment.
Select Retry delay and enter 30 for the number of seconds. This number can be adjusted to a value that's appropriate for your environment.
Select Allow apps to access the private key.
Select Prevent the private key date from being extracted in the keychain.
Select Automatic profile redistribution and enter 30 for the days before the certificate expires. This number can be adjusted to a value that's appropriate for your environment.
Click Save.
For more information about the Kandji SCEP Library Item, please refer to the SCEP Profile support article.
Configure for macOS 13+
All of the settings in section apply for all versions of macOS unless otherwise noted. You need to configure separate instances of Okta Device Access for users on macOS 13 and macOS 14+.
Create and configure the Desktop Password Sync app integration in Okta
In the Okta Admin Console, go to Applications > Applications Catalog.
Search for Desktop Password Sync and select the app.
.png)
Click Add Integration. If you get an error message saying This feature isn’t enabled, contact your Okta account representative.
.png)
Open Desktop Password Sync from your Applications list to configure it.
On the General tab, you can edit the application label or use the default label.
On the Sign on tab, take note of the Client ID. You will need this when creating the Single Sign-On profile.
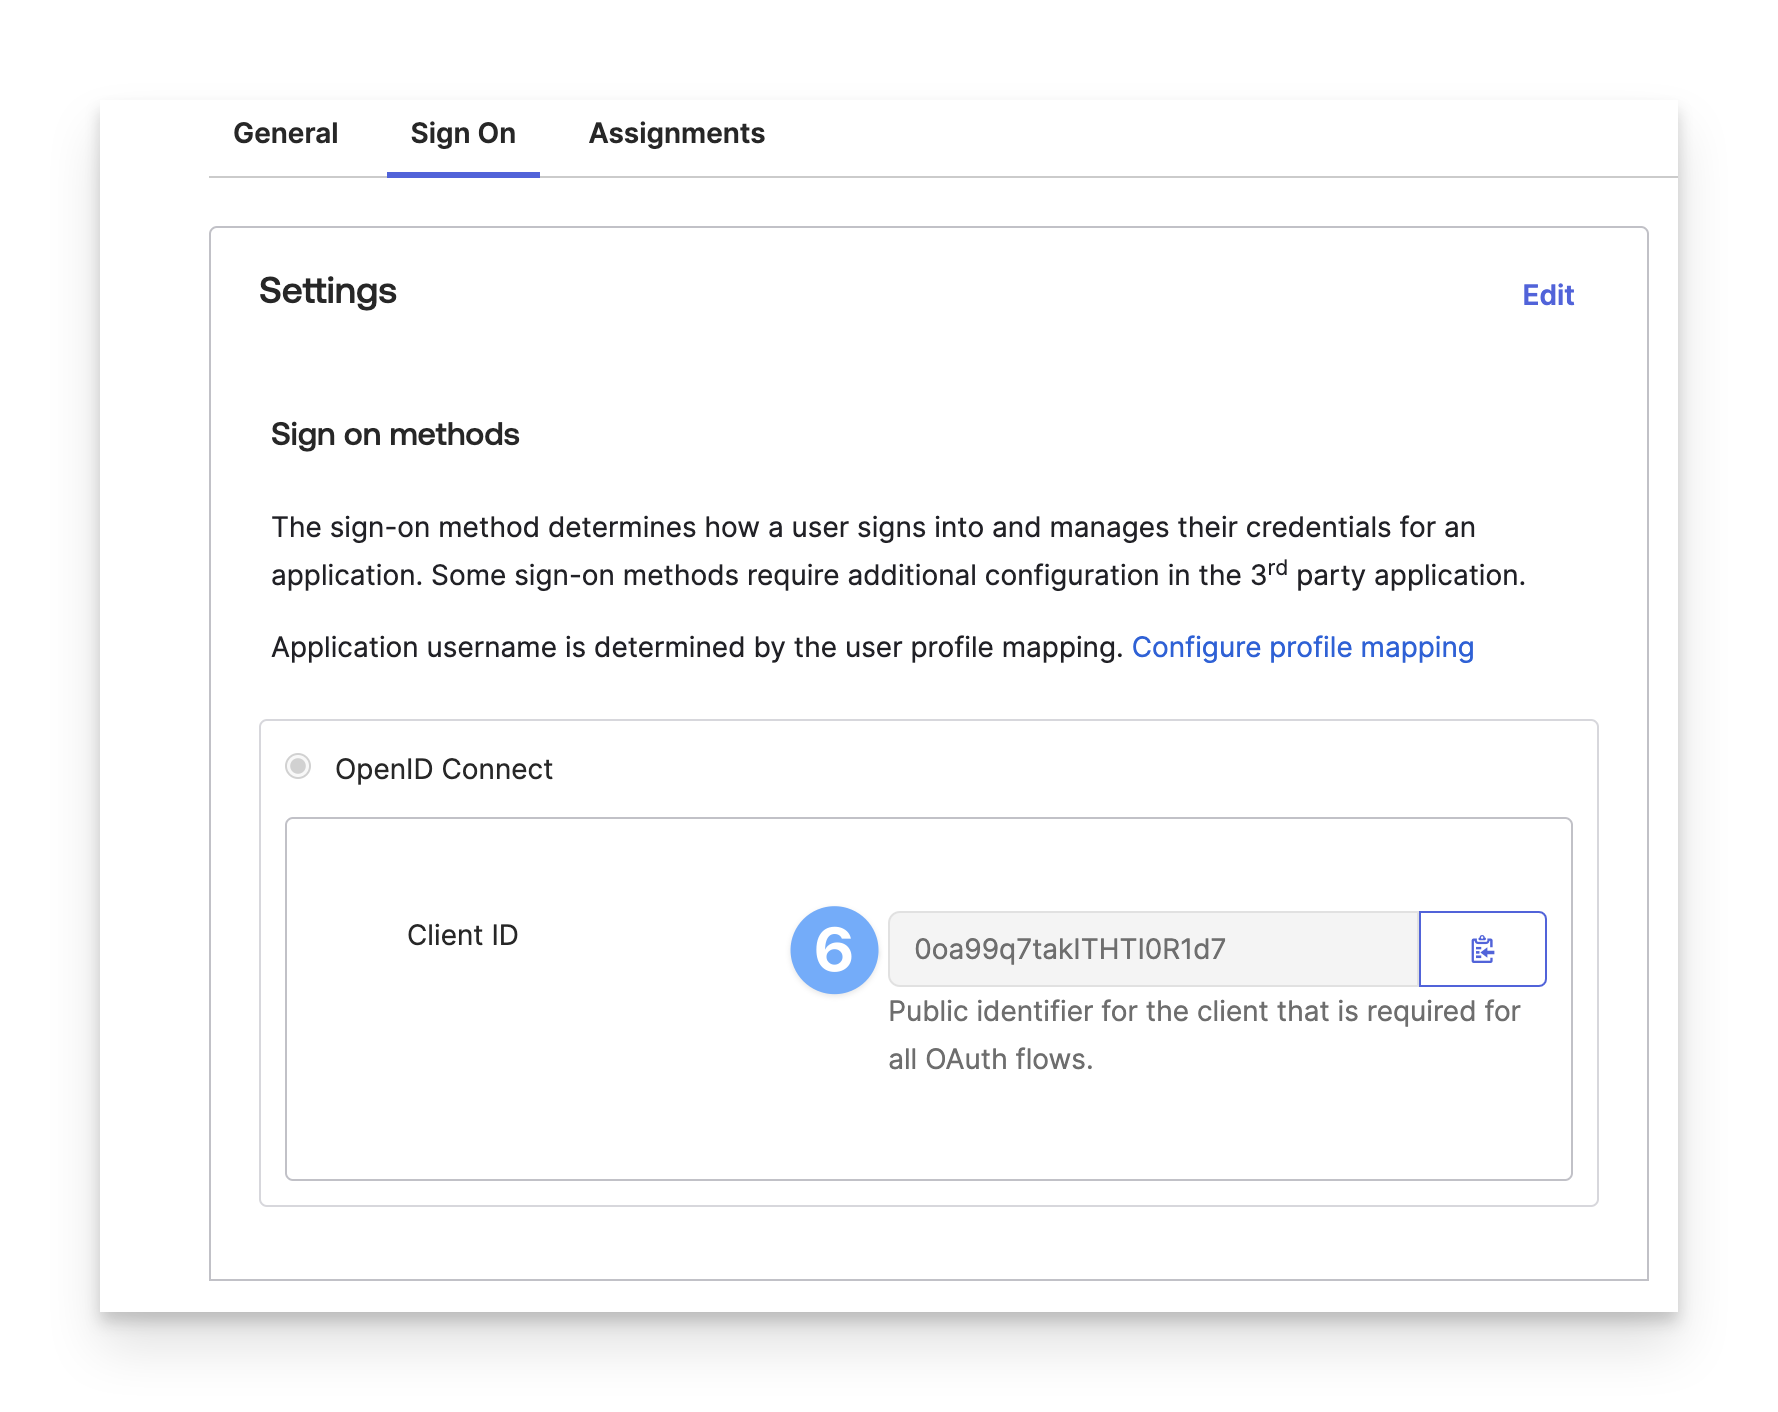
Assign the app to individual users or groups on the Assignments tab. Users must be assigned the app to use Desktop Password Sync.
Click Save.
Edit the mobileconfig template files
Three mobileconfig files are needed to enable Desktop Password Sync: two Platform SSO configuration profile and an Okta Verify configuration profile. When supporting macOS 13 and macOS 14+, you will need to deploy two of the Okta Verify configuration profiles. Follow the below steps to edit the provided templates and add them as Custom Profile Library Items in Kandji. You must edit them using a plain text editor such as Visual Studio Code, Sublime Text, BBEdit, etc.
If you will not be supporting macOS 13 devices in your fleet, you can skip deploying the Okta_PSSO_Configuration_Template_macOS13.mobileconfig Profile.
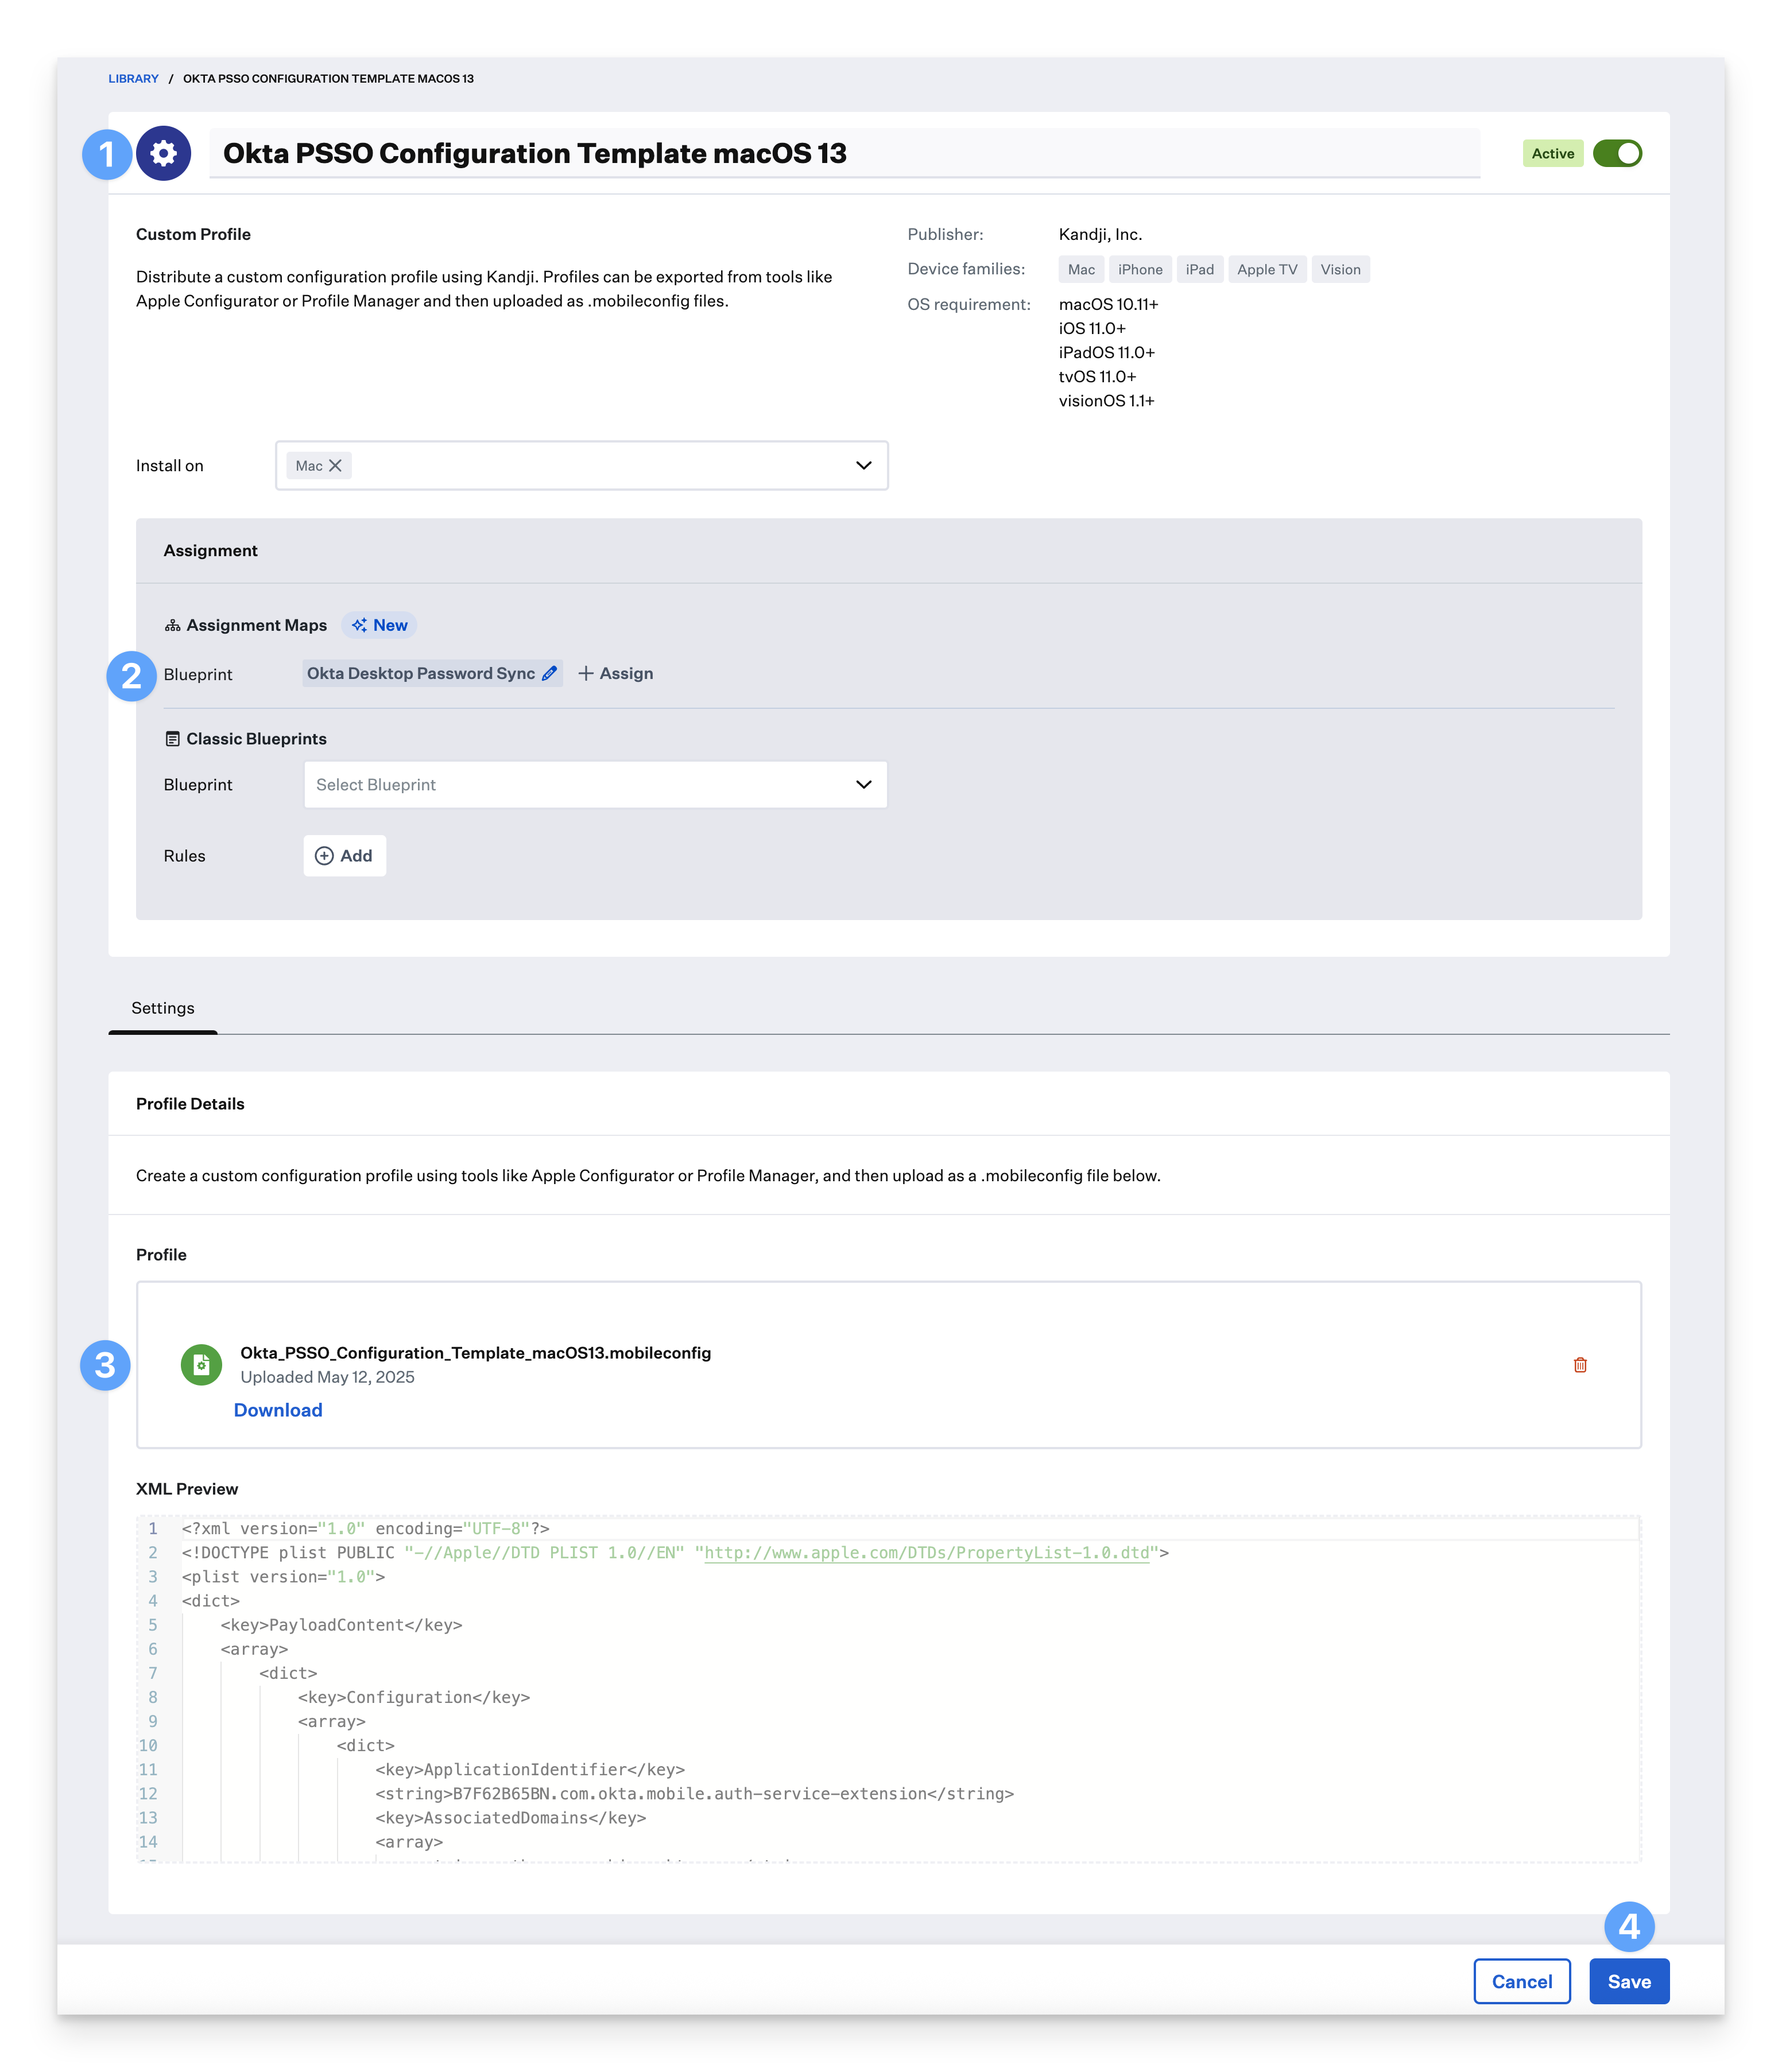
Download the Okta_PSSO_Configuration_Template_macOS13.mobileconfig file from the Kandji support GitHub repository (GitHub Link).
Download the Okta_PSSO_Configuration_Template_macOS14.mobileconfig file from the Kandji support GitHub repository (GitHub Link).
Download the Okta_Verify_Configuration_Template.mobileconfig file from the Kandji support GitHub repository (GitHub Link).
Okta PSSO Configuration Profile for macOS 13
Open the Okta_PSSO_Configuration_Template_macOS13.mobileconfig file in your text editor.
Update the AssociatedDomains section of the Associated Domains payload, replacing the example domain with your own Okta tenant address.
Example: authsrv:accuhive.okta.com
<key>AssociatedDomains</key>
<array>
     <!-- replace accuhive.okta.com with your tenant address -->
     <string>authsrv:accuhive.okta.com</string>
</array>
Update the URLs section of the Extensible SSO payload and replace the example domain with your Okta tenant information. Leave the rest of the URL as is.
Example: accuhive.okta.com
<key>URLs</key>
<array>
     <!-- replace accuhive.okta.com with your tenant address -->
     <string>https://accuhive.okta.com/device-access/api/v1/nonce</string>
     <string>https://accuhive.okta.com/oauth2/v1/token</string>
</array>
Save the mobileconfig file.
Okta PSSO Configuration Profile for macOS 14+
Open the Okta_PSSO_Configuration_Template_macOS14.mobileconfig file in your text editor.
Update the AssociatedDomains section of the Associated Domains auth-service-extension payload, replacing the example domain with your own Okta tenant address.
Example: authsrv:accuhive.okta.com
<key>ApplicationIdentifier</key>
<string>B7F62B65BN.com.okta.mobile.auth-service-extension</string>
<key>AssociatedDomains</key>
<array>
     <!-- replace accuhive.okta.com with your tenant address -->
     <string>authsrv:accuhive.okta.com</string>
Update the AssociatedDomains section of the Associated Domains payload, replacing the example domain with your own Okta tenant address.
Example: authsrv:accuhive.okta.com
<key>ApplicationIdentifier</key>
<string>B7F62B65BN.com.okta.mobile</string>
<key>AssociatedDomains</key>
<array>
     <!-- replace accuhive.okta.com with your tenant address -->
     <string>authsrv:accuhive.okta.com</string>
Update the URLs section of the Extensible SSO payload and replace the example domain with your Okta tenant information. Leave the rest of the URL as is.
Example: accuhive.okta.com
<key>URLs</key>
<array>
     <!-- replace accuhive.okta.com with your tenant address -->
     <string>https://accuhive.okta.com/device-access/api/v1/nonce</string>
     <string>https://accuhive.okta.com/oauth2/v1/token</string>
</array>
Save the mobileconfig file.
Okta Verify Configuration Profile
Open the Okta_Verify_Configuration_Template.mobileconfig file in your text editor.
Update the OktaVerify.OrgUrl section of the com.okta.mobile payload with your Okta tenant URL.
Example: https://accuhive.okta.com
<dict>
     <!-- replace accuhive.okta.com with your tenant -->
     <key>OktaVerify.OrgUrl</key>
     <string>https://accuhive.okta.com</string>
Update the OktaVerify.PasswordSyncClientID section of the com.okta.mobile payload with the Client ID of your Desktop Password Sync app that you recorded earlier.
<!-- replace YOUR_CLIENT_ID with your Desktop Password Sync app Client ID -->
<key>OktaVerify.PasswordSyncClientID</key>
<string>YOUR_CLIENT_ID</string>
Update the OktaVerify.OrgUrl section of the com.okta.mobile.auth-service-extension payload with your Okta tenant URL.
<dict>
     <!-- replace accuhive.okta.com with your tenant -->
     <key>OktaVerify.OrgUrl</key>
     <string>https://accuhive.okta.com</string>
Update the OktaVerify.PasswordSyncClientID section of the com.okta.mobile.auth-service-extension payload with the Client ID of your Desktop Password Sync app that you recorded earlier.
<!-- replace YOUR_CLIENT_ID with your Desktop Password Sync app Client ID -->
<key>OktaVerify.PasswordSyncClientID</key>
<string>YOUR_CLIENT_ID</string>
Update the the PlatformSSO.ProtocolVersion section of the com.okta.mobile.auth-service-extension payload to the appropriate version for your org.
For macOS 13 Ventura, set to 1.0
For macOS 14 Sonoma or later, set to 2.0
<key>PlatformSSO.ProtocolVersion</key>
<string>2.0</string>
If you will be supporting macOS 13 and macOS 14+, you will need to save multiple versions of the Okta_Verify_Configuration_Template.mobileconfig file, each with the appropriate PlatformSSO.ProtocolVersion setting.
Save the mobileconfig file(s).
Create the Custom Profiles Library Items in Kandji
To add this Library Item to your Kandji Library, follow the steps outlined in the Library Overview article.
Provide a name for the Library Item.
Assign it to your desired Blueprints.
Upload the modified “Okta_PSSO_Configuration_Template_macOS13.mobileconfig” file.
Click Save.
Repeat the previous steps in this section for the “Okta_PSSO_Configuration_Template_macOS14.mobileconfig” and for all “Okta_Verify_Configuration_Template.mobileconfig” files.
Ensure the Okta Verify app is assigned to the same Blueprint(s) as the Custom Profile Library Items created earlier.
Follow the steps in the Deploying Profiles with Assignment Maps section so that Profiles are only deployed to compatible devices.
Once the profiles and Okta Verify app are distributed to your Mac computers, users will be prompted to register and synchronize their Okta password.
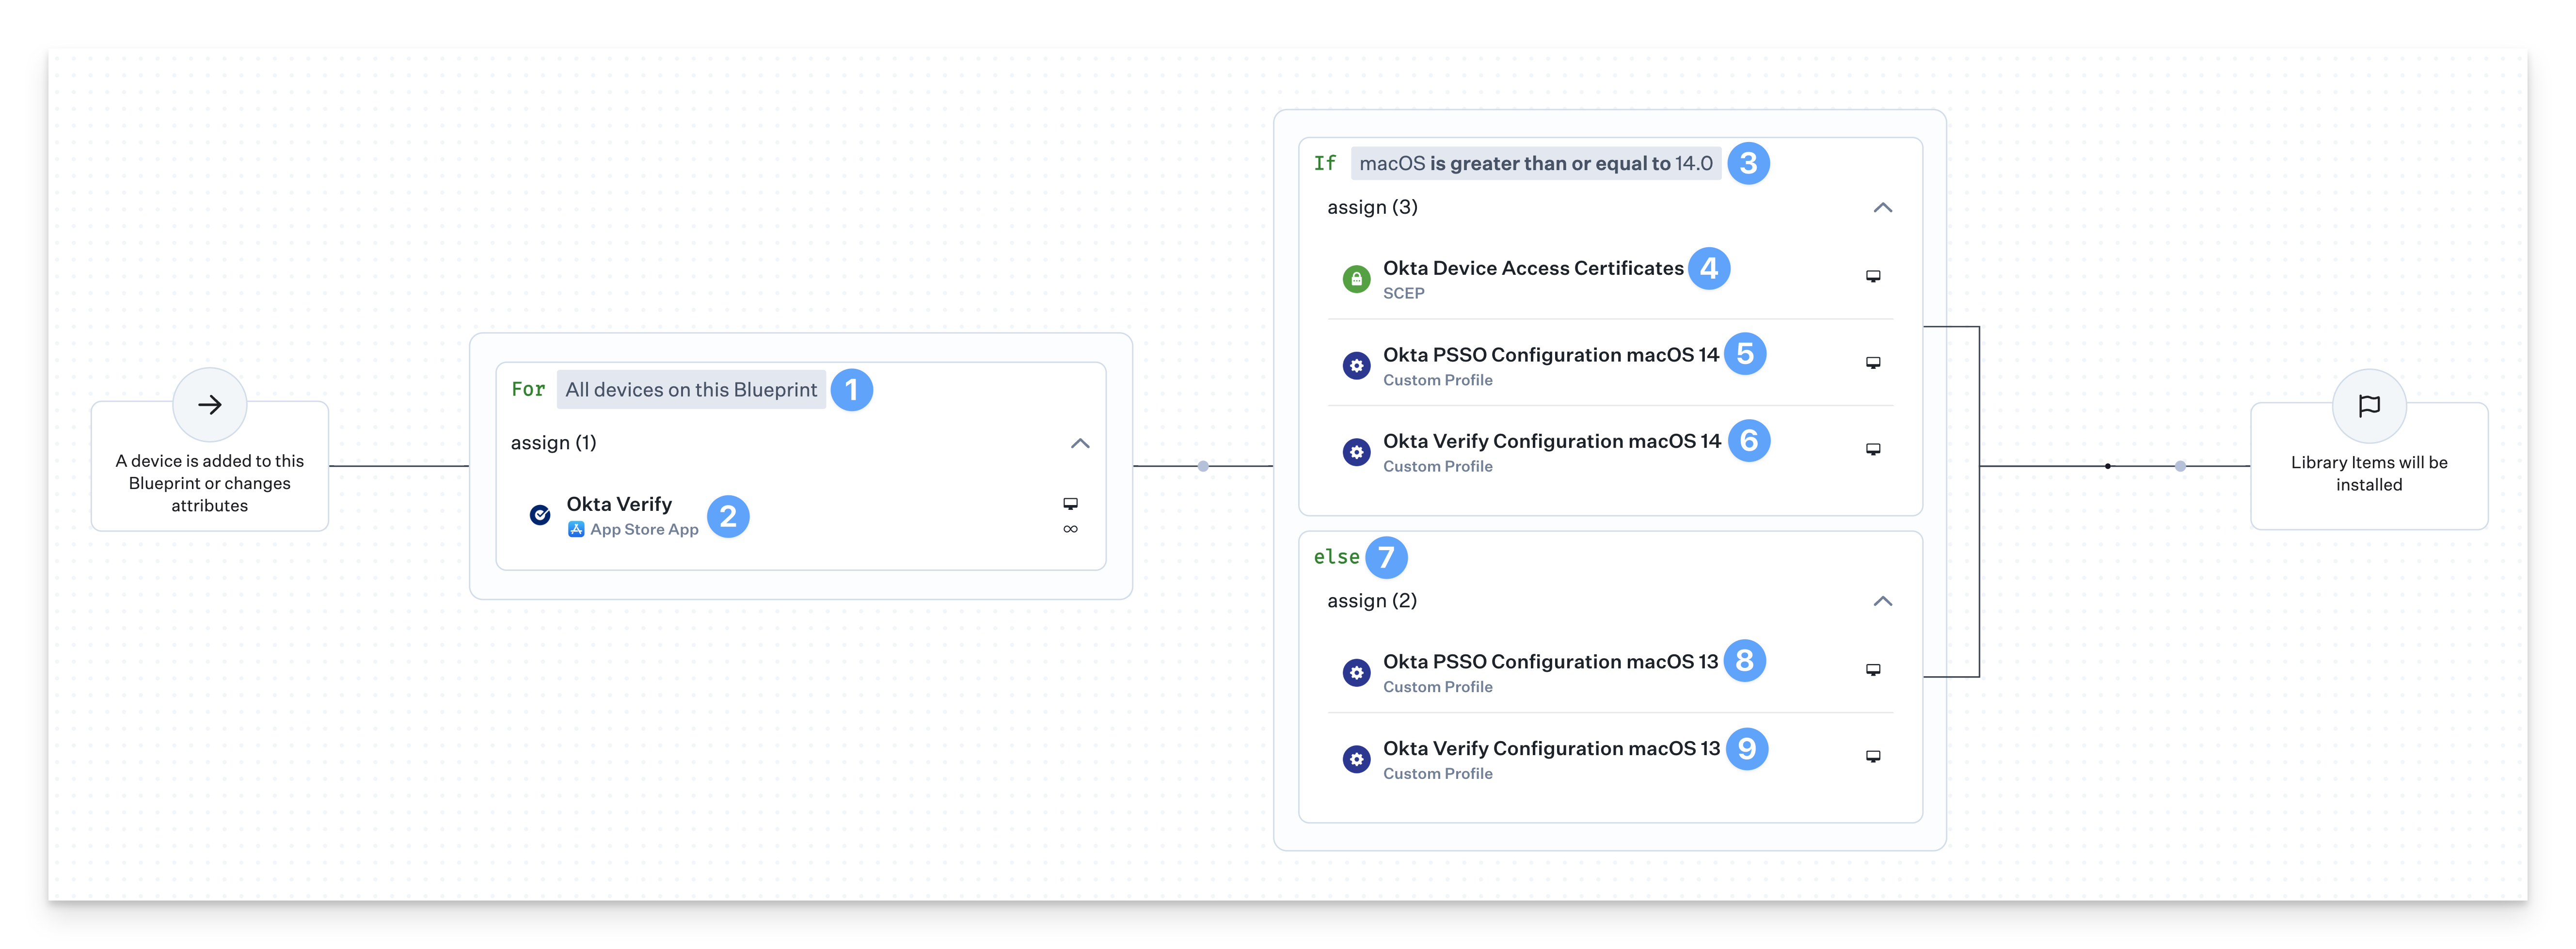
Deploying Profiles with Assignment Maps
There are up to four Crowdstrike Custom Profiles that need conditional logic to ensure they are deployed to the correct devices. An Assignment Map provides an easy solution for all of your devices in one convenient view.
Please review our Creating a Blueprint and Using Conditional Logic in Assignment Maps articles.
Start with the For All devices on this Blueprint conditional block.
Assign the Okta Verify App Store App to the block.
Set the top of the conditional block to If macOS is greater than or equal to 14.0.
Assign the Okta Device Access Certificates SCEP Library Item to the conditional block.
Assign the Okta PSSO Configuration macOS 14 Custom Profile to the conditional block.
Assign the Okta Verify Configuration macOS 14 Custom Profile to the conditional block.
Continue in the else section of the conditional block.
Assign the Okta PSSO Configuration macOS 13 Custom Profile to the conditional block.
Assign the Okta Verify Configuration macOS 13 Custom Profile to the conditional block.
User Experience and Next Steps
With Platform SSO, by design from Apple, in Users & Groups settings, in the Password field, the Change button is not available.
Once the Okta Desktop Password configuration is complete, you can have your users follow the steps in the User Experience with Okta Desktop Password Sync article to get them registered.