Note: Microsoft Entra ID is the new name for Azure AD (Azure Active Directory)
When using Passport in a federated Microsoft Entra ID Environment, you'll need to create a Home Realm Discovery (HRD) policy in Entra ID using PowerShell. An HRD policy allows Passport to use Entra ID as the source of truth for authenticating users when deploying Passport in a federated environment where Entra ID acts as the service provider (SP) federated with an external identity provider (IdP).
Before You Begin
Ensure that:
You have an Azure account with an active subscription. If you don't already have one, you can create an account for free here.
You have access to an Azure user with one of the following roles: Global Administrator, Cloud Application Administrator, Application Administrator, or service principal owner.
You have to install the AzureADPreview module.
You cannot install both the preview version and the GA version on the same computer at the same time. You will need to uninstall the AzureAD module before installing the AzureADPreview module.
You have a Windows or Windows Server machine (can be virtual) with the latest Azure AD PowerShell cmdlet preview installed.
Both users' and users' passwords are already being synced by the federated identity provider.
In an Azure AD and Active Directory hybrid setup, password hash sync must be enabled between Azure AD and Active Directory using Microsoft Entra Connect Sync.
In a cloud IdP scenario, be sure that both usernames and passwords are synced from the federated IdP.
You have already created the Kandji Passport Enterprise app in Entra ID, per the instructions in this support article.
You have created the Passport Library Item in Kandji using this support article.
Authentication Flow in a Federated Environment
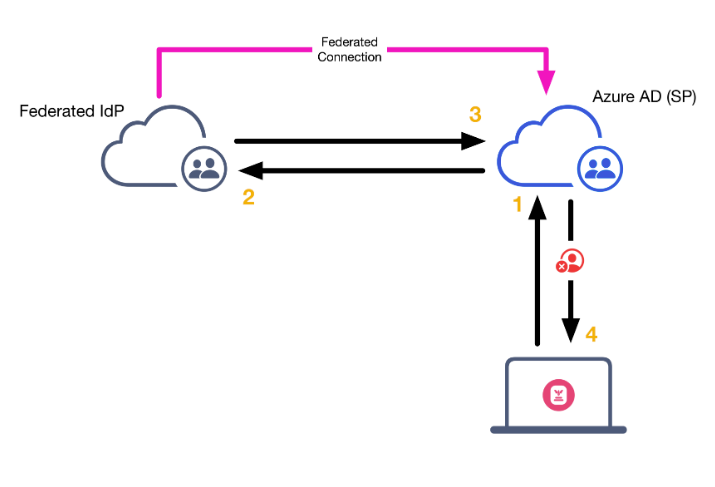
The diagram below depicts the Passport authentication flow when Entra ID acts as a service provider (SP) federated with another identity provider (IdP).
When a user attempts to authenticate via Passport, the request looks like this:
Passport sends an authentication request to Azure AD.
Azure AD forwards the auth request to the federated IdP.
The auth request is validated by the IdP and sent back to Azure AD.
Azure AD receives the validation but has no reason to forward it to Passport, at which point the user’s authentication attempt fails, and an error is delivered to Passport.

Authentication Flow with HRD Configured
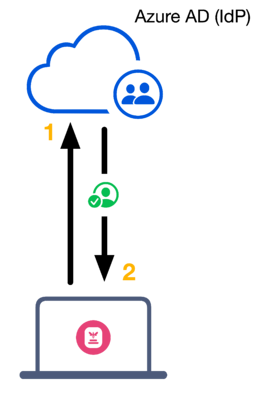
The diagram below depicts the Passport authentication flow with an Azure AD Home Realm Discovery policy. When a user attempts to authenticate via Passport, the request looks like this:
Passport sends an authentication request to Azure AD.
Entra ID validates the authentication request using the HRD policy and responds to Passport with a successful user authentication response.

Create an HRD Policy
An HRD Policy is only required when using the Mac Login Passport authentication mode. If you are using the Web Login Passport authentication mode, the HRD Policy is not required.
Go to the Windows computer.
Open PowerShell as an administrator.
Connect to your Enra ID tenant with the command Connect-AzureAD. A web view will open, prompting you will enter your Entra ID credentials.
Create a new policy with the command below. This will allow users to authenticate to a specific application directly with Entra ID with their username and password in a federated environment. If you have existing HRD policies in your environment, you can set the DisplayName to something like KandjiHRDPolicy.
New-AzureADPolicy -Definition @("{`"HomeRealmDiscoveryPolicy`":{`"AllowCloudPasswordValidation`":true}}") -DisplayName KandjiHRDPolicy -Type HomeRealmDiscoveryPolicyRun the command Get-AzureADPolicy to list the policy that you've just created and copy the ObjectID string listed under the ID column in the output.
Run the command Get-AzureADServicePrincipal to get the Service Principal (Azure Enterprise Application) ObjectID.
If you know the name of the Enterprise Application, you can add the -SearchString your_app_name_here to the command above. Example: Get-AzureADServicePrincipal -SearchString "Kandji Passport"
Run the following command to add the Kandji Passport Enterprise Application to the HRD policy. Replace <ObjectID of the Service Principal> with the Kandji Enterprise App ObjectIDcopied earlier. Replace <ObjectId of the Policy> with the HDR ObjectIDcopied earlier.
Add-AzureADServicePrincipalPolicy -Id <ObjectID of the Service Principal> -RefObjectId <ObjectId of the Policy>If you do not create the right policy, you can use the following command to remove it and try again.
Remove-AzureADServicePrincipalPolicy -id <ObjectId of the Service Principal> -PolicyId <ObjectId of the policy>
Check the apps assigned with Get-AzureADPolicyAppliedObject -id <ObjectId of the Policy>.
To disconnect the PowerShell session from Azure, use the command Disconnect-AzureAD.